Thursday, December 29, 2011
Appetizer Party Platter
I'm always looking for easy appetizers to bring to a party or to make ahead when I'm hosting a party in my own home. It's easy to fall into a rut and make the same boring appetizers over and over, I'm guilty of it myself. I created this appetizer plate with some of the usual items but tried to add something different to make them feel new again. The stuffed mushrooms and peppers had the usual bread crumb filling but I added some crispy prosciutto to the mixture. On the mushrooms I added a little piece of Italian Fontina cheese to the top of each one. The potatoes (trader joe's teeny tiny potatoes) were sauteed with shallots sundried tomatoes and then tossed with a premade muffaletta salad. Recipes to come soon!
Wednesday, December 28, 2011
Aunt Maryann's Chicken and Rice
Hope everyone had a very Merry Christmas and enjoyed your time with your families! I had a great Christmas and unfortunately have ended it with a cold. I wanted some comfort food and this one has always been like a warm hug on a cold day. Aunt Maryann has been making her chicken and rice for as long as I can remember. It's famous in our family! It's not the Spanish chicken and rice that probably comes to mind. This is another one of those red sauce dishes that my family loves. It's also one of those dishes that is great the next day (just don't heat it in the microwave, it makes chicken taste funny) and I even love it room temperature. Add peas to it if you'd like to add some color or maybe some chopped parsley for a little pop. Aunt Maryann doesn't do that but she said it would be acceptable. You can use the entire chicken for this recipe but I've been removing the back and the wings and freezing it for stock. There isn't too much meat there and it will serve me better when I make soup. The only additions I made were adding about 1 tsp Italian seasoning and 2 frozen basil cubes because I like to see the specks of color throughout the dish and I use a whole onion. Here is Aunt Maryann's recipe as she gave it to me.
Aunt Maryann’s Chicken and Rice
Serves 4
Ingredients:
2 tbsp. olive oil
1 – 16 oz. can Delmonte tomato sauce
1 can water
1 whole chicken cut up and cleaned
½ medium size onion
2 cloves of garlic chopped
2 cups white rice
4 cups warm water
2 tbsp. parmesan cheese
salt and pepper to taste
In a Dutch Oven heat oil and brown chicken. Remove chicken and set aside.
Lower flame and Saute onion and garlic until translucent.
Add s, and one can of water (from the delmonte sauce) and stir. Add cheese salt and pepper, stir well. When sauce reaches a simmer return chicken to the pan and make sure it is covered with the sauce, cover with lid. Let the sauce cook for ½ hour.
Add 4 cups of water to sauce and let it come to a boil. Add ½ tsp of salt or to taste. Add white rice, stir frequently. Let cook until all liquid is absorbed and rice is cooked approximately 30 minutes.
Click here for a printable version of this recipe.
Thursday, December 22, 2011
Shot Glass Apple Parfaits
Here's another item from my cookie exchange brunch. This brilliant and adorable idea came from Jersey Girl Cooks. It's a great addition to a brunch menu because you can make them ahead of time and it's a healthy option. I don't know about you but if I was at a party and full size yogurt parfaits were served next to lots of savory exciting food I would totally pass it up. However, this is something that veryone can partake in because it's just a few bites! I topped mine with pecan praline granola from trader joes and left some plain with just a sprinkle of cinnamon on top for a guest who can't eat nuts. I made mine with only 2 chopped apples because these dishes are so tiny. My mom bought this little set for me for Christmas last year and I just got around to using them. They came with these tiny little plates, forks and spoons! They are resusable OR disposable.
Shot Glass Apple Parfaits
From Jersey Girl Cooks
The amount of ingredients you need will vary with the size of your shot glasses.
Ingredients:
4 medium apples, cored and chopped into 1 inch cubes
1/2 cup brown sugar
1 teaspoon cinnamon
1/2 teaspoon ground nutmeg
1 teaspoon vanilla paste – if you do not have vanilla paste you can regular vanilla extract
1 tablespoon lemon juice
24oz. vanilla flavored Greek yogurt
granola
1/2 cup brown sugar
1 teaspoon cinnamon
1/2 teaspoon ground nutmeg
1 teaspoon vanilla paste – if you do not have vanilla paste you can regular vanilla extract
1 tablespoon lemon juice
24oz. vanilla flavored Greek yogurt
granola
Directions:
Take chopped apples and put in large bowl. Add brown sugar, cinnamon, nutmeg, lemon juice and vanilla paste, stir and let sit for 30 minutes. The apples will be sitting in a bowl of sugary liquid. Take apples and juice and put into saucepan on the stove. Simmer for about 10 to 15 minutes or until the apples are soft but not falling apart. The sugar mixture should thicken up a bit. Remove from heat and let cool. Layer the yogurt and cooled apple mixture into 12 shot glasses (less or more depending on the size of your glasses). Continue until you reach the top of each glass, then sprinkle with the granola.
Shot Glass Apple Parfaits
Here's another item from my cookie exchange brunch. This brilliant and adorable idea came from Jersey Girl Cooks. It's a great addition to a brunch menu because you can make them ahead of time and it's a healthy option. I don't know about you but if I was at a party and full size yogurt parfaits were served next to lots of savory exciting food I would totally pass it up. However, this is something that veryone can partake in because it's just a few bites! I topped mine with pecan praline granola from trader joes and left some plain with just a sprinkle of cinnamon on top for a guest who can't eat nuts. I made mine with only 2 chopped apples because these dishes are so tiny. My mom bought this little set for me for Christmas last year and I just got around to using them. They came with these tiny little plates, forks and spoons! They are resusable OR disposable.
Shot Glass Apple Parfaits
From Jersey Girl Cooks
The amount of ingredients you need will vary with the size of your shot glasses.
Ingredients:
4 medium apples, cored and chopped into 1 inch cubes
1/2 cup brown sugar
1 teaspoon cinnamon
1/2 teaspoon ground nutmeg
1 teaspoon vanilla paste – if you do not have vanilla paste you can regular vanilla extract
1 tablespoon lemon juice
24oz. vanilla flavored Greek yogurt
granola
1/2 cup brown sugar
1 teaspoon cinnamon
1/2 teaspoon ground nutmeg
1 teaspoon vanilla paste – if you do not have vanilla paste you can regular vanilla extract
1 tablespoon lemon juice
24oz. vanilla flavored Greek yogurt
granola
Directions:
Take chopped apples and put in large bowl. Add brown sugar, cinnamon, nutmeg, lemon juice and vanilla paste, stir and let sit for 30 minutes. The apples will be sitting in a bowl of sugary liquid. Take apples and juice and put into saucepan on the stove. Simmer for about 10 to 15 minutes or until the apples are soft but not falling apart. The sugar mixture should thicken up a bit. Remove from heat and let cool. Layer the yogurt and cooled apple mixture into 12 shot glasses (less or more depending on the size of your glasses). Continue until you reach the top of each glass, then sprinkle with the granola.
Wednesday, December 21, 2011
Pignoli Cookies
This is a recipe that my mom has been using for years. It was given to her by her sweet Italian coworker Josephine (along with her lemon drop cookies that we love too!) She has since passed and has no idea how her recipe has lived on in our household. Thank you Josephine for your fabulous recipe!
You may want to double this recipe because they disappear quickly!
Pignoli Cookies
You may want to double this recipe because they disappear quickly!
Pignoli Cookies
Ingredients:
1 cup pine nuts
1 can 8 oz. almond paste (cut in sm. pieces)
2/3 cups sugar
2 egg whites
1 tsp grated lemon zest
Directions:
Preheat oven to 325 degrees. Mix paste, sugar, egg whites, and lemon zest with a electric hand mixer . Drop a teaspoonful onto a non-stick cookie sheet. Gently press pine nuts onto top of cookie. Bake 20-25 minutes.
Yield – 24 cookies
Pignoli Cookies
This is a recipe that my mom has been using for years. It was given to her by her sweet Italian coworker Josephine (along with her lemon drop cookies that we love too!) She has since passed and has no idea how her recipe has lived on in our household. Thank you Josephine for your fabulous recipe!
You may want to double this recipe because they disappear quickly!
Pignoli Cookies
You may want to double this recipe because they disappear quickly!
Pignoli Cookies
Ingredients:
1 cup pine nuts
1 can 8 oz. almond paste (cut in sm. pieces)
2/3 cups sugar
2 egg whites
1 tsp grated lemon zest
Directions:
Preheat oven to 325 degrees. Mix paste, sugar, egg whites, and lemon zest with a electric hand mixer . Drop a teaspoonful onto a non-stick cookie sheet. Gently press pine nuts onto top of cookie. Bake 20-25 minutes.
Yield – 24 cookies
Tuesday, December 20, 2011
Red and Green Potato Pancakes
Who doesn't love a potato pancake, right? Crispy flavored potatoes that can be eaten at any time of the day make this girl very happy! I thought that this would be a great addition to my cookie exchange brunch menu. In fact, I think it was the best new recipe I made that day. I found this recipe on The Enchanted Cook and loved her kicked up version of potato pancakes. Even more I loved how the red of the pepper and the green of the chives made this seem very festive!
I never made potato pancakes before so I got a little nervous when the potatoes didn't hold together. I just went with it and they were perfectly fine. I spoke to a few people and was told that this is totally normal. Thank goodness! I slightly adapted this recipe because I had pre-shredded potatoes I wanted to use and wasn't sure what the measurements were. I also bought a package of thinly sliced pancetta and it only had 6 slices in it. I wouldn't mind doubling that next time. It all worked out and I was very pleased. The only thing that I think that could be improved is my drying of the potatoes. The potatoes should be very dry and I was a little lazy about it. I ended up with a pool of eggy water at the bottom of the bowl which made the last batch a little messy. I served these two per person with a poached egg cradled in between. Of course, at that point I was rushing too much to take a picture. No worries though, I will be making these again without a doubt and will be sure to get a good picture of the plated dish.
If you would like to make these patties a couple of hours ahead of time just leave them out on the counter and right before serving preheat the oven to 375 place on baking sheet and heat until warmed through.
Serving options - Sour Cream or cream fraiche topped with chopped chives, Serve with a poached egg on top or enjoy them as they are.
Click here for a printable version of this recipe.
I never made potato pancakes before so I got a little nervous when the potatoes didn't hold together. I just went with it and they were perfectly fine. I spoke to a few people and was told that this is totally normal. Thank goodness! I slightly adapted this recipe because I had pre-shredded potatoes I wanted to use and wasn't sure what the measurements were. I also bought a package of thinly sliced pancetta and it only had 6 slices in it. I wouldn't mind doubling that next time. It all worked out and I was very pleased. The only thing that I think that could be improved is my drying of the potatoes. The potatoes should be very dry and I was a little lazy about it. I ended up with a pool of eggy water at the bottom of the bowl which made the last batch a little messy. I served these two per person with a poached egg cradled in between. Of course, at that point I was rushing too much to take a picture. No worries though, I will be making these again without a doubt and will be sure to get a good picture of the plated dish.
Red and Green Potato Pancakes
makes 18-20 pancakes
Ingredients:
1 1/2 bags Simply Potatoes, shredded hash brown potatoes
6 - 12 slices pancetta, thinly sliced
2 cups shredded cheesem, combo bag Monterrey Jack and Cheddar
4 large cloves garlic, minced
1 red bell pepper, diced
1 small package of scallions, finely chopped (approx 1/2 cup)
3 large eggs, beaten
kosher salt and fresh cracked pepper to taste
canola oil for frying
Directions:
1. Preheat the oven to 375 degrees. Line a baking sheet with parchment paper. Place pancetta slices on parchment and bake for about 15 minutes or until crispy. Remove from oven and blot off oil with paper towel. When cool enough to handle give them a rought chop.
2. In a large bowl mix together potatoes, pancetta, cheese, garlic, bell pepper, onions, eggs, salt, and pepper.
3. Heat a large skillet over medium high heat and add oil. Form patties in your head and press together (they will not stay together completely). Place the mound of potatoes in hot skillet. Cook approximately 1-2 minutes per side or until browned. Do not overcrowd pan and work in batches until done.
3. Remove pancakes and place on paper towel-lined plate to absorb any excess oil or moisture. Use paper towels in between layers as you stack them on the plate.
If you would like to make these patties a couple of hours ahead of time just leave them out on the counter and right before serving preheat the oven to 375 place on baking sheet and heat until warmed through.
Serving options - Sour Cream or cream fraiche topped with chopped chives, Serve with a poached egg on top or enjoy them as they are.
Click here for a printable version of this recipe.
Red and Green Potato Pancakes
Who doesn't love a potato pancake, right? Crispy flavored potatoes that can be eaten at any time of the day make this girl very happy! I thought that this would be a great addition to my cookie exchange brunch menu. In fact, I think it was the best new recipe I made that day. I found this recipe on The Enchanted Cook and loved her kicked up version of potato pancakes. Even more I loved how the red of the pepper and the green of the chives made this seem very festive!
I never made potato pancakes before so I got a little nervous when the potatoes didn't hold together. I just went with it and they were perfectly fine. I spoke to a few people and was told that this is totally normal. Thank goodness! I slightly adapted this recipe because I had pre-shredded potatoes I wanted to use and wasn't sure what the measurements were. I also bought a package of thinly sliced pancetta and it only had 6 slices in it. I wouldn't mind doubling that next time. It all worked out and I was very pleased. The only thing that I think that could be improved is my drying of the potatoes. The potatoes should be very dry and I was a little lazy about it. I ended up with a pool of eggy water at the bottom of the bowl which made the last batch a little messy. I served these two per person with a poached egg cradled in between. Of course, at that point I was rushing too much to take a picture. No worries though, I will be making these again without a doubt and will be sure to get a good picture of the plated dish.
If you would like to make these patties a couple of hours ahead of time just leave them out on the counter and right before serving preheat the oven to 375 place on baking sheet and heat until warmed through.
Serving options - Sour Cream or cream fraiche topped with chopped chives, Serve with a poached egg on top or enjoy them as they are.
Click here for a printable version of this recipe.
I never made potato pancakes before so I got a little nervous when the potatoes didn't hold together. I just went with it and they were perfectly fine. I spoke to a few people and was told that this is totally normal. Thank goodness! I slightly adapted this recipe because I had pre-shredded potatoes I wanted to use and wasn't sure what the measurements were. I also bought a package of thinly sliced pancetta and it only had 6 slices in it. I wouldn't mind doubling that next time. It all worked out and I was very pleased. The only thing that I think that could be improved is my drying of the potatoes. The potatoes should be very dry and I was a little lazy about it. I ended up with a pool of eggy water at the bottom of the bowl which made the last batch a little messy. I served these two per person with a poached egg cradled in between. Of course, at that point I was rushing too much to take a picture. No worries though, I will be making these again without a doubt and will be sure to get a good picture of the plated dish.
Red and Green Potato Pancakes
makes 18-20 pancakes
Ingredients:
1 1/2 bags Simply Potatoes, shredded hash brown potatoes
6 - 12 slices pancetta, thinly sliced
2 cups shredded cheesem, combo bag Monterrey Jack and Cheddar
4 large cloves garlic, minced
1 red bell pepper, diced
1 small package of scallions, finely chopped (approx 1/2 cup)
3 large eggs, beaten
kosher salt and fresh cracked pepper to taste
canola oil for frying
Directions:
1. Preheat the oven to 375 degrees. Line a baking sheet with parchment paper. Place pancetta slices on parchment and bake for about 15 minutes or until crispy. Remove from oven and blot off oil with paper towel. When cool enough to handle give them a rought chop.
2. In a large bowl mix together potatoes, pancetta, cheese, garlic, bell pepper, onions, eggs, salt, and pepper.
3. Heat a large skillet over medium high heat and add oil. Form patties in your head and press together (they will not stay together completely). Place the mound of potatoes in hot skillet. Cook approximately 1-2 minutes per side or until browned. Do not overcrowd pan and work in batches until done.
3. Remove pancakes and place on paper towel-lined plate to absorb any excess oil or moisture. Use paper towels in between layers as you stack them on the plate.
If you would like to make these patties a couple of hours ahead of time just leave them out on the counter and right before serving preheat the oven to 375 place on baking sheet and heat until warmed through.
Serving options - Sour Cream or cream fraiche topped with chopped chives, Serve with a poached egg on top or enjoy them as they are.
Click here for a printable version of this recipe.
Monday, December 19, 2011
Truffle Brownie Cups - Secret Recipe Club
This is my second month participating in The Secret Recipe Club and it's been so much fun! This month I was assigned our hostess Angie's Blog, Big Bear's Wife. She has a really cool Visual Recipe Index which helped when it came to choosing the recipe. They are all separated by category and you can see a photo right there in the listing. There were so many recipes I wanted to try but there just isn't enough time in the month of December! The cannoli dip recipe looked amazing and I am definitely tucking that one away for future use. I chose the recipe for Truffle Brownie Cups. It sounded like chocolatey heaven! Chocolate ganache inside a chocolate brownie cup is absolutely my idea of dessert! These are the perfect size for a little midday snack...or two!
These little brownies are very simple to make and I think I would try them as regular brownies too because they are delicious! I only got about 18 out of them so I'd suggest doubling the recipe because they will disappear quickly! My only question to ask Angie is about the ganache. I've never made it before and I'm not sure if it's supposed to harden and all. I put it in the fridge for about an hour because it was still liquidy after 10 minutes. I piped it through which made it easier but it was still too liquidy to hold the shape of the star tip. Angie, I am an awful baker and I know it's just me! Got any tips for this baking challenged girl?
You've got to try these everyone, they are a deliciously chocolaty treat!
Truffle Brownie Cups
from Big Bears Wife
Be sure to check out Big Bear's Wife for all of her decorating ideas for this recipe!
These little brownies are very simple to make and I think I would try them as regular brownies too because they are delicious! I only got about 18 out of them so I'd suggest doubling the recipe because they will disappear quickly! My only question to ask Angie is about the ganache. I've never made it before and I'm not sure if it's supposed to harden and all. I put it in the fridge for about an hour because it was still liquidy after 10 minutes. I piped it through which made it easier but it was still too liquidy to hold the shape of the star tip. Angie, I am an awful baker and I know it's just me! Got any tips for this baking challenged girl?
You've got to try these everyone, they are a deliciously chocolaty treat!
Truffle Brownie Cups
from Big Bears Wife
Ingredients:
1 2/3 cups chocolate chips
2 tablespoons butter (do NOT substitute margarine)
1/2 cup sugar
1 egg
2/3 cup flour
3/4 cup heavy whipping cream
Directions:
Preheat oven to 325.
Spray mini-muffin pan with non-stick spray.
Place 2/3 cup chocolate chips in microwave safe bowl with the butter. Microwave on high 40-60 seconds or until smooth, stirring after each 20 second interval.
Add sugar and egg, stir until smooth.
Add flour and stir until just incorporated. Using a small scoop divide batter evenly among the wells. Flatten the top to make smooth surface with the Mini-Tart Shaper.
Bake 10-12 minutes or until edges are set (DO NOT over bake).
Meanwhile, pour cream into microwave safe bowl. Heat on HIGH for 1-2 minutes or until hot.
Add the rest of the chocolate chips and stir until smooth. Place bowl into freezer for 10-12 minutes or until mixture is cool and starting to thicken. This will be your chocolate ganache.
Once the ganache is thickened, scoop it out of the bowl into a Ziploc bag. I cut a hole in the corner of my baggie and added a star piping tip to give the ganache a little design.
Remove pan from oven; cool 2 minutes. Press tops of brownies with the Pampered Chef Mini- Tart Shaper to make a well. Cool in pan 3 minutes.
Once they are cooled, use your Ziploc baggie full of your chocolate ganache and pipe the ganache into each brownie well.
Be sure to check out Big Bear's Wife for all of her decorating ideas for this recipe!
Friday, December 16, 2011
Daphne Oz's Citrus Salt Scrub - Homemade Gift Idea
Have you ever watched The Chew? I may have mentioned it here before. I record it every day but don't always have the time to watch them all. It takes up quite a bit of space on our DVR! On one of the episodes Daphne Oz (daughter of Doctor Oz) made a homemade body scrub. The ingredients are just oil, citrus zest (I used a combo of grapefruit, orange, lemon and lime zest) and salt. I thought it would be just perfect to give as a gift to the girls attending my cookie exchange. This was so easy to do and you can really go crazy with dressing up the packaging. I kept it very simple and just put a little Christmas Ribbon on it because as always I wait until the last minute to get everything done! The scrub was made with coconut oil which is a little bit expensive. You can get it at Trader joes for about $6 a jar. Since I multiplied this recipe times 6 I would have needed another jar but instead I just added some canola oil. That helped to keep the cost down. I picked up these 5.4 oz jars from The Container Store which were pretty inexpensive and of course can be reused. The recipe was enough to fill about 8 jars. I'm going to experiment with this recipe and try using sugar in place of the salt. What do you think? Wouldn't you love to receive a gift like this? I know I would!
Citrus Salt Scrub
Daphne Oz
Ingredients:
- 1/2 cup sea salt
- 1/2 cup coconut oil (can substitute almond oil/olive oil/vegetable oil)
- 1 1/2 teaspoons citrus zest (you can use lemon, lime, orange, grapefruit, or a combination)
Combine all ingredients in a large bowl, make sure to not allow any water near the bowl. Any water will dissolve the salt. Pour mixture into an airtight container and store in a cool dry place.
To use: While in the shower, mix ingredients with your finger tips. Apply body scrub with hands or soft wash cloth. Rinse mixture off completely.
Thursday, December 15, 2011
Chicken Madison
Just yesterday I came across a post on a blog I read called Feasts and Fotos, while going through my google reader. The post was for Chicken Madison and I was drooling over Susan's photos. Susan has tons of great recipes and photos on her blog. If you haven't been there before be sure to check it out. She and I seem to like a lot of the same food and we don't live too far from each other (Susan, we should meet for dinner one day!). I would love to try her Lentil and Sausage Stew, Fusilli with Sausage and Artichokes, and her Potato Fennel and Leek Soup. I could search her blog all day and bookmark recipes! Okay so back to the chicken. Her recipe was incredibly simple and I had pretty much everything on hand to make it. I had to make a couple of simple substitutions for example I used the dry sundried tomatoes because I was out of the ones that are packed in oil. I didn't have anymore fresh parsley but I had some scallions which I threw in. I had the cremini mushrooms and a half a package of shitake's so I tossed those in as well. The result was a delicious tender chicken in a flavorful sauce that I put over some buttered orzo. Susan served hers over creamy white bean puree which she promises to post soon. I bet that is out of this world! One thing to keep in mind that if you are using very thin sliced cutlets like I did you will not need to cook it for 20 minutes at the end like the recipe states. I found that the chicken was almost completely cooked from browning it and only simmered it in the pan sauce for as long as it took the orzo to cook which was about 8 minutes. I will definitely be making this again and I hope you'll give it a try as well!
Chicken Madison
From Feasts and Fotos
6 thin chicken cutlets ( cut in 1/2 down the center)
whole wheat flour
4 cloves garlic, smashed
2 garlic cloves, minced
1 box crimini mushrooms, cleaned and sliced (not too thin)
1 12 oz bag of frozen artichoke hearts, slightly defrosted, cut in half lengthwise
1 Tbsp tomato paste
1 7 ounce jar of sun dried tomatoes, drained and sliced, 2-3 tbsp of oil reserved
1/2 – 3/4 cup white wine3/4 – 1 cup chicken stock, low sodium
1 tsp fresh thyme, chopped
1/3 cup fresh parsley, chopped
Salt & PepperOlive oil
1 Tbsp butter, optional
Directions: Heat a few tablespoons of olive oil in a large skillet over medium heat. Add 2 smashed garlic cloves, to season the oil. Season chicken with salt & pepper and coat in the flour, tapping off excess. Add some of the chicken to oil, being sure not to overcrowd the pan, cooking them until golden brown on each side. Remove from skillet and transfer to a plate. Be careful to watch the cloves of garlic and be sure to remove them once they appear to be getting too golden. You don’t want them to burn. Repeat with remaining chicken and smashed garlic.
In the same skillet you just cooked all the chicken in add the oil you reserved from the sun dried tomatoes. Into that oil add the artichoke hearts and cook, stirring occasionally, for 3-4 minutes. To the artichokes add the sliced mushrooms and cook for 3-4 minutes, or until they start to soften a bit. Next, add the tomato paste and garlic and stir into the vegetables, cooking for 2-3 minutes. At this point I usually add some salt and pepper. Next comes the liquids…add the wine first, allowing it to simmer for a few minutes. Finally add the chicken stock and the fresh thyme. Allow liquids to simmer together for 4-5 minutes. To thicken this liquid mixture a bit, add approximately 1-2 tablespoons of the leftover whole wheat flour to the skillet, whisking to mix.
Add the chicken cutlets back into the skillet, nestling them all in under the veggies, gently, as best as you can. Ideally you want most of the chicken to be submerged into the liquid. It is ok if the tops of a few pieces are not submerged. If you feel you need a bit more liquid, add some more chicken stock. Put a cover on the skillet, lower heat to low and gently simmer for 15 – 20 minutes, or until the chicken is cooked through. Once cooked, turn off heat and add the parsley. If you so choose, you can also add the butter, just to finish the sauce a bit. A little tablespoon of butter won’t hurt!
Chicken Madison
Just yesterday I came across a post on a blog I read called Feasts and Fotos, while going through my google reader. The post was for Chicken Madison and I was drooling over Susan's photos. Susan has tons of great recipes and photos on her blog. If you haven't been there before be sure to check it out. She and I seem to like a lot of the same food and we don't live too far from each other (Susan, we should meet for dinner one day!). I would love to try her Lentil and Sausage Stew, Fusilli with Sausage and Artichokes, and her Potato Fennel and Leek Soup. I could search her blog all day and bookmark recipes! Okay so back to the chicken. Her recipe was incredibly simple and I had pretty much everything on hand to make it. I had to make a couple of simple substitutions for example I used the dry sundried tomatoes because I was out of the ones that are packed in oil. I didn't have anymore fresh parsley but I had some scallions which I threw in. I had the cremini mushrooms and a half a package of shitake's so I tossed those in as well. The result was a delicious tender chicken in a flavorful sauce that I put over some buttered orzo. Susan served hers over creamy white bean puree which she promises to post soon. I bet that is out of this world! One thing to keep in mind that if you are using very thin sliced cutlets like I did you will not need to cook it for 20 minutes at the end like the recipe states. I found that the chicken was almost completely cooked from browning it and only simmered it in the pan sauce for as long as it took the orzo to cook which was about 8 minutes. I will definitely be making this again and I hope you'll give it a try as well!
Chicken Madison
From Feasts and Fotos
6 thin chicken cutlets ( cut in 1/2 down the center)
whole wheat flour
4 cloves garlic, smashed
2 garlic cloves, minced
1 box crimini mushrooms, cleaned and sliced (not too thin)
1 12 oz bag of frozen artichoke hearts, slightly defrosted, cut in half lengthwise
1 Tbsp tomato paste
1 7 ounce jar of sun dried tomatoes, drained and sliced, 2-3 tbsp of oil reserved
1/2 – 3/4 cup white wine3/4 – 1 cup chicken stock, low sodium
1 tsp fresh thyme, chopped
1/3 cup fresh parsley, chopped
Salt & PepperOlive oil
1 Tbsp butter, optional
Directions: Heat a few tablespoons of olive oil in a large skillet over medium heat. Add 2 smashed garlic cloves, to season the oil. Season chicken with salt & pepper and coat in the flour, tapping off excess. Add some of the chicken to oil, being sure not to overcrowd the pan, cooking them until golden brown on each side. Remove from skillet and transfer to a plate. Be careful to watch the cloves of garlic and be sure to remove them once they appear to be getting too golden. You don’t want them to burn. Repeat with remaining chicken and smashed garlic.
In the same skillet you just cooked all the chicken in add the oil you reserved from the sun dried tomatoes. Into that oil add the artichoke hearts and cook, stirring occasionally, for 3-4 minutes. To the artichokes add the sliced mushrooms and cook for 3-4 minutes, or until they start to soften a bit. Next, add the tomato paste and garlic and stir into the vegetables, cooking for 2-3 minutes. At this point I usually add some salt and pepper. Next comes the liquids…add the wine first, allowing it to simmer for a few minutes. Finally add the chicken stock and the fresh thyme. Allow liquids to simmer together for 4-5 minutes. To thicken this liquid mixture a bit, add approximately 1-2 tablespoons of the leftover whole wheat flour to the skillet, whisking to mix.
Add the chicken cutlets back into the skillet, nestling them all in under the veggies, gently, as best as you can. Ideally you want most of the chicken to be submerged into the liquid. It is ok if the tops of a few pieces are not submerged. If you feel you need a bit more liquid, add some more chicken stock. Put a cover on the skillet, lower heat to low and gently simmer for 15 – 20 minutes, or until the chicken is cooked through. Once cooked, turn off heat and add the parsley. If you so choose, you can also add the butter, just to finish the sauce a bit. A little tablespoon of butter won’t hurt!
Monday, December 12, 2011
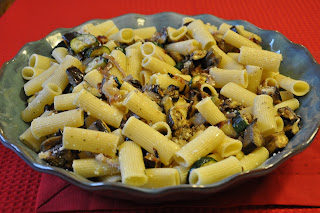
Pasta with Roasted Eggplant, Zucchini and Onions
This past weekend I hosted my 3rd Annual Cookie Exchange. It was so much fun as always! I chose Fudge Puddles as my cookie this year because I loved them so much when I made them a few months ago. Hopefully everyone who attended liked them too!
My party is always a brunch because I know how busy everyone is this time of year and I don't want anyone to feel like this is a hassle. My goal is for this to be a lot of fun and I want people to want to come back year after year. I'm happy to say that most people have come back each year! My brunch menu was Hash Brown Potato pancakes (which I am renaming Red and Green Potato Pancakes - recipe coming soon) topped with a poached egg, Pumpkin Bread Pudding, Shot Glass Apple Parfaits (recipe coming this week), Spinach Quiche, Stromboli (coming soon), Buffalo Chicken Stromboli (coming soon) and Pasta with Roasted Eggplant, Zucchini and Onions. I think the menu was very well received! I've made the pasta dish before and this time I took a little bit of a short cut and instead of making my own garlic oil I tossed it with a bottled one we bought on Newbury Street in Boston. I prefer it with the homemade garlic oil but the other worked in a pinch (I was running very late!).
My friend Rachel has her own blog and posted about the cookie exchange. I hope you'll check out her post! Don't forget to leave her a comment and show her some love. :-) The photo above was taken by her and her fancy new camera!
Click here for a printable version of this recipe.
My party is always a brunch because I know how busy everyone is this time of year and I don't want anyone to feel like this is a hassle. My goal is for this to be a lot of fun and I want people to want to come back year after year. I'm happy to say that most people have come back each year! My brunch menu was Hash Brown Potato pancakes (which I am renaming Red and Green Potato Pancakes - recipe coming soon) topped with a poached egg, Pumpkin Bread Pudding, Shot Glass Apple Parfaits (recipe coming this week), Spinach Quiche, Stromboli (coming soon), Buffalo Chicken Stromboli (coming soon) and Pasta with Roasted Eggplant, Zucchini and Onions. I think the menu was very well received! I've made the pasta dish before and this time I took a little bit of a short cut and instead of making my own garlic oil I tossed it with a bottled one we bought on Newbury Street in Boston. I prefer it with the homemade garlic oil but the other worked in a pinch (I was running very late!).
My friend Rachel has her own blog and posted about the cookie exchange. I hope you'll check out her post! Don't forget to leave her a comment and show her some love. :-) The photo above was taken by her and her fancy new camera!
Michele’s Pasta with Roasted Vegetables
Ingredients:
1 large eggplant, cubed
3 small zucchini, cubed
1 large red onion, sliced into half moons
2 teaspoons dried of frozen basil (Dorat)
1 cup Extra Virgin Oil Olive, plus more for drizzling
10 cloves garlic, peeled and cracked
Crushed red pepper to taste
Salt and fresh cracked pepper to taste
2 lbs pasta, any short cut
Directions:
1. Pre-heat oven to 375º
2. Spread veggies over multiple baking sheets (do not over crowd), drizzle with EVOO, salt and pepper. Toss to coat with oil.
3. Roast in oven for approximately 20 minutes or until brown and tender, tossing once in between to prevent sticking and ensure even cooking.
4. In a small pot; heat garlic, oil, crushed red pepper, basil and salt for about 10 – 15 minutes over medium-low heat. This is to infuse garlic with oil – do not let the garlic brown. Once cooled remove garlic and discard.
5. Cook pasta in boiling salted water until al dente, drain.
6. Toss with veggies and infused oil. Sprinkle with Romano cheese and serve.
Monday, December 5, 2011
Mamacello Pasta
I have made this dish a couple of times and found in my old files on my computer. I don't think I posted it because I felt that it didn't photograph well. I decided that the recipe is definitely blog worthy even if the photo isn't. Rachael Ray makes this with spaghetti or linguine but Steve and I are very big fans of rigatoni and I make it all the time. What's your favorite type of pasta?
From Every Day with Rachael Ray
June-July 2006
4 SERVINGS
Ingredients:
1 pound spaghetti or linguine
Salt
3 tablespoons extra-virgin olive oil (EVOO), 3 turns of the pan
4 garlic cloves, finely chopped
2 pinches of crushed red pepper flakes
1/2 cup dry white wine (a couple of glugs)
Zest of 2 lemons, 1 lemon juiced
1/2 cup heavy cream (eyeball it)
Handful of flat-leaf parsley, chopped
1 cup fresh basil (20 leaves), shredded
Freshly grated Parmigiano- Reggiano or Pecorino Romano cheese, for topping the pasta and passing around the table
Directions:
1. Bring a large pot of water to a boil. Add the pasta and salt the water liberally. Cook the pasta until al dente, 6 to 7 minutes.
2. While the pasta cooks, heat a deep skillet over low heat and add the EVOO, 3 turns of the pan. When the olive oil is warm, add the garlic and red pepper flakes. Turn off the heat and set the garlic aside for 5 minutes, then raise the heat to medium, add the wine and lemon zest and boil to reduce the wine by half, about 3 minutes.
3. When the pasta is just about cooked, add a ladle of starchy pasta cooking water to the skillet with the sauce and stir in the heavy cream. When the cream is warmed through, whisk the lemon juice into the sauce and season with salt. Drain the pasta and toss with the sauce, then let the pasta stand for 1 minute so it can soak up a little of the sauce and lots of flavor. Toss with the parsley, basil and a couple handfuls of grated cheese, then serve immediately. Pass around the extra cheese at the table.
Subscribe to:
Posts (Atom)