Showing posts with label dessert. Show all posts

Thursday, February 23, 2012

Swedish Apple Pie

It's Dinner Divas time and once again it was my turn to make dessert.  The theme was Swedish food which is not the easiest to work with but I was able to find a Swedish dessert thanks to Stacey Snacks!  This was easy enough that I was able to make it and not worry too much about it being perfect.  It is a very simple rustic dish that everyone seemed pleased with....even though I forgot to peel the apples! Talk about rustic!  If you ever find yourself with an abundance of apples you've got to give Swedish Apple Pie a try. 


Swedish Apple Pie
Source: Stacey Snacks


Ingredients:

5 medium apples, peeled and sliced
1/2 cup chopped walnuts
1/4 cup sugar (for sprinkling)
2 tsp cinnamon
1/8 tsp. cloves

Topping:

1 cup sugar
1 cup flour
3/4 cup butter (1 and 1/2 sticks)
1 egg


Directions:

Preheat oven to 350F. Butter a 9" pie pan and fill with sliced apples & walnuts.

Mix the 1/4 cup sugar with the cinnamon and cloves. Sprinkle over apples and coat well.

Melt butter and add remaining ingredients (flour, sugar and egg). Pour the batter over apples and spread with a rubber spatula.

Bake for about 45 minutes or until golden.


Swedish Apple Pie

It's Dinner Divas time and once again it was my turn to make dessert.  The theme was Swedish food which is not the easiest to work with but I was able to find a Swedish dessert thanks to Stacey Snacks!  This was easy enough that I was able to make it and not worry too much about it being perfect.  It is a very simple rustic dish that everyone seemed pleased with....even though I forgot to peel the apples! Talk about rustic!  If you ever find yourself with an abundance of apples you've got to give Swedish Apple Pie a try. 


Swedish Apple Pie
Source: Stacey Snacks


Ingredients:

5 medium apples, peeled and sliced
1/2 cup chopped walnuts
1/4 cup sugar (for sprinkling)
2 tsp cinnamon
1/8 tsp. cloves

Topping:

1 cup sugar
1 cup flour
3/4 cup butter (1 and 1/2 sticks)
1 egg


Directions:

Preheat oven to 350F. Butter a 9" pie pan and fill with sliced apples & walnuts.

Mix the 1/4 cup sugar with the cinnamon and cloves. Sprinkle over apples and coat well.

Melt butter and add remaining ingredients (flour, sugar and egg). Pour the batter over apples and spread with a rubber spatula.

Bake for about 45 minutes or until golden.


Monday, December 19, 2011

Truffle Brownie Cups - Secret Recipe Club

This is my second month participating in The Secret Recipe Club and it's been so much fun! This month I was assigned our hostess Angie's Blog, Big Bear's Wife.  She has a really cool Visual Recipe Index which helped when it came to choosing the recipe.  They are all separated by category and you can see a photo right there in the listing.  There were so many recipes I wanted to try but there just isn't enough time in the month of December! The cannoli dip recipe looked amazing and I am definitely tucking that one away for future use.  I chose the recipe for Truffle Brownie Cups.  It sounded like chocolatey heaven!   Chocolate ganache inside a chocolate brownie cup is absolutely my idea of dessert!  These are the perfect size for a little midday snack...or two!

These little brownies are very simple to make and I think I would try them as regular brownies too because they are delicious!  I only got about 18 out of them so I'd suggest doubling the recipe because they will disappear quickly!  My only question to ask Angie is about the ganache.  I've never made it before and I'm not sure if it's supposed to harden and all.  I put it in the fridge for about an hour because it was still liquidy after 10 minutes.  I piped it through which made it easier but it was still too liquidy to hold the shape of the star tip.  Angie, I am an awful baker and I know it's just me! Got any tips for this baking challenged girl?

You've got to try these everyone, they are a deliciously chocolaty treat!

Truffle Brownie Cups
from Big Bears Wife


Ingredients:

1 2/3 cups chocolate chips
2 tablespoons butter (do NOT substitute margarine)
1/2 cup sugar
1 egg
2/3 cup flour
3/4 cup heavy whipping cream


Directions:

Preheat oven to 325.

Spray mini-muffin pan with non-stick spray.

Place 2/3 cup chocolate chips in microwave safe bowl with the butter. Microwave on high 40-60 seconds or until smooth, stirring after each 20 second interval.

Add sugar and egg, stir until smooth.

Add flour and stir until just incorporated. Using a small scoop divide batter evenly among the wells. Flatten the top to make smooth surface with the Mini-Tart Shaper.

Bake 10-12 minutes or until edges are set (DO NOT over bake).


Meanwhile, pour cream into microwave safe bowl. Heat on HIGH for 1-2 minutes or until hot.

Add the rest of the chocolate chips and stir until smooth. Place bowl into freezer for 10-12 minutes or until mixture is cool and starting to thicken. This will be your chocolate ganache.

Once the ganache is thickened, scoop it out of the bowl into a Ziploc bag. I cut a hole in the corner of my baggie and added a star piping tip to give the ganache a little design.

Remove pan from oven; cool 2 minutes. Press tops of brownies with the Pampered Chef Mini- Tart Shaper to make a well. Cool in pan 3 minutes.

Once they are cooled, use your Ziploc baggie full of your chocolate ganache and pipe the ganache into each brownie well.

Be sure to check out Big Bear's Wife for all of her decorating ideas for this recipe!


Truffle Brownie Cups - Secret Recipe Club

This is my second month participating in The Secret Recipe Club and it's been so much fun! This month I was assigned our hostess Angie's Blog, Big Bear's Wife.  She has a really cool Visual Recipe Index which helped when it came to choosing the recipe.  They are all separated by category and you can see a photo right there in the listing.  There were so many recipes I wanted to try but there just isn't enough time in the month of December! The cannoli dip recipe looked amazing and I am definitely tucking that one away for future use.  I chose the recipe for Truffle Brownie Cups.  It sounded like chocolatey heaven!   Chocolate ganache inside a chocolate brownie cup is absolutely my idea of dessert!  These are the perfect size for a little midday snack...or two!

These little brownies are very simple to make and I think I would try them as regular brownies too because they are delicious!  I only got about 18 out of them so I'd suggest doubling the recipe because they will disappear quickly!  My only question to ask Angie is about the ganache.  I've never made it before and I'm not sure if it's supposed to harden and all.  I put it in the fridge for about an hour because it was still liquidy after 10 minutes.  I piped it through which made it easier but it was still too liquidy to hold the shape of the star tip.  Angie, I am an awful baker and I know it's just me! Got any tips for this baking challenged girl?

You've got to try these everyone, they are a deliciously chocolaty treat!

Truffle Brownie Cups
from Big Bears Wife


Ingredients:

1 2/3 cups chocolate chips
2 tablespoons butter (do NOT substitute margarine)
1/2 cup sugar
1 egg
2/3 cup flour
3/4 cup heavy whipping cream


Directions:

Preheat oven to 325.

Spray mini-muffin pan with non-stick spray.

Place 2/3 cup chocolate chips in microwave safe bowl with the butter. Microwave on high 40-60 seconds or until smooth, stirring after each 20 second interval.

Add sugar and egg, stir until smooth.

Add flour and stir until just incorporated. Using a small scoop divide batter evenly among the wells. Flatten the top to make smooth surface with the Mini-Tart Shaper.

Bake 10-12 minutes or until edges are set (DO NOT over bake).


Meanwhile, pour cream into microwave safe bowl. Heat on HIGH for 1-2 minutes or until hot.

Add the rest of the chocolate chips and stir until smooth. Place bowl into freezer for 10-12 minutes or until mixture is cool and starting to thicken. This will be your chocolate ganache.

Once the ganache is thickened, scoop it out of the bowl into a Ziploc bag. I cut a hole in the corner of my baggie and added a star piping tip to give the ganache a little design.

Remove pan from oven; cool 2 minutes. Press tops of brownies with the Pampered Chef Mini- Tart Shaper to make a well. Cool in pan 3 minutes.

Once they are cooled, use your Ziploc baggie full of your chocolate ganache and pipe the ganache into each brownie well.

Be sure to check out Big Bear's Wife for all of her decorating ideas for this recipe!


Wednesday, November 30, 2011

Pumpkin Bread Pudding

I have to thank Mary Crehan one of my fabulous Willow House hostesses for this recipe.  I tasted it at her party a couple of weeks ago and knew I had to make it.  It tastes delicious when it's warm right from the oven and is even great cold or room temperature.  I had some for breakfast the next day with a drizzle of agave syrup. I'm considering replacing my Baked French Toast with this dish for my cookie exchange. What do you think?

I didn't make any changes to this recipe besides adding some cinnamon and nutmeg and used 2 cups half and half and 2 cups whole milk.  Any combination of heavy cream, half and half and whole milk will work just like it does for the french toast. The bread pudding isn't overly sweet but some of my family felt that a dusting of powdered sugar would really complete this dish.  I did notice that it was an option but to be honest on Thanksgiving I was just too busy to pull out the shaker and fill with powdered sugar.  Next time I'll do that.  After speaking with Mary she mentioned that when making this the second time she sliced the bread instead of cubing it and it held it's shape better.  So I guess you can do it either way. 

Pumpkin Bread Pudding

Ingredients:
1 loaf of challah bread, cut into cubes (or slices)
1 small can of pumpkin puree
2 cups of half and half
2 cups of whole milk
1 cup sugar
sprinkling of cinnamon and nutmeg, to taste
6 eggs, beaten
powdered sugar, optional

Directions:

Preheat oven to 375 degrees.  Place cubed bread on a baking sheet and bake until toasted and browned (10-15 mins).  Combine half and half, milk and sugar, add pumpkin, eggs, cinnamon and nutmeg.  Transfer bread cubes to a 9x13x2 casserole dish and cover with milk mixture.  Toss all the bread to coat.  Wrap with plastic wrap and allow bread to absorb milk in the refrigerator overnight.  The next day bake in a 375 degree oven for about 1 hour or until all the liquid is absorbed.  Sprinkle with powdered sugar.  Serve warm, room temperature or cold. 

Click here for a printable version of this recipe.


Pumpkin Bread Pudding

I have to thank Mary Crehan one of my fabulous Willow House hostesses for this recipe.  I tasted it at her party a couple of weeks ago and knew I had to make it.  It tastes delicious when it's warm right from the oven and is even great cold or room temperature.  I had some for breakfast the next day with a drizzle of agave syrup. I'm considering replacing my Baked French Toast with this dish for my cookie exchange. What do you think?

I didn't make any changes to this recipe besides adding some cinnamon and nutmeg and used 2 cups half and half and 2 cups whole milk.  Any combination of heavy cream, half and half and whole milk will work just like it does for the french toast. The bread pudding isn't overly sweet but some of my family felt that a dusting of powdered sugar would really complete this dish.  I did notice that it was an option but to be honest on Thanksgiving I was just too busy to pull out the shaker and fill with powdered sugar.  Next time I'll do that.  After speaking with Mary she mentioned that when making this the second time she sliced the bread instead of cubing it and it held it's shape better.  So I guess you can do it either way. 

Pumpkin Bread Pudding

Ingredients:
1 loaf of challah bread, cut into cubes (or slices)
1 small can of pumpkin puree
2 cups of half and half
2 cups of whole milk
1 cup sugar
sprinkling of cinnamon and nutmeg, to taste
6 eggs, beaten
powdered sugar, optional

Directions:

Preheat oven to 375 degrees.  Place cubed bread on a baking sheet and bake until toasted and browned (10-15 mins).  Combine half and half, milk and sugar, add pumpkin, eggs, cinnamon and nutmeg.  Transfer bread cubes to a 9x13x2 casserole dish and cover with milk mixture.  Toss all the bread to coat.  Wrap with plastic wrap and allow bread to absorb milk in the refrigerator overnight.  The next day bake in a 375 degree oven for about 1 hour or until all the liquid is absorbed.  Sprinkle with powdered sugar.  Serve warm, room temperature or cold. 

Click here for a printable version of this recipe.


Wednesday, November 23, 2011

Hummingbird Cake


This was the dessert I made for the Southern themed dinner hosted by my friend Gina for our dinner group.  This was a really delicious (and surprisingly easy) cake to make.  I thought that I would have tasted the pineapple but perhaps it was just there to provide moisture.  I heard that this is also made with coconut which would have been delicious. I'm not sure why the directions say to add the pecans to the frosting.  That seemed a little strange to me so I just chopped them up and added them around the sides. This was a wonderful dessert that I'd make again!


Ingredients:

1 cup (110 grams) pecans

3 cups (390 grams) all-purpose flour

2 cups (400 grams) granulated white sugar

1 teaspoon baking soda

1/2 teaspoon salt

1 teaspoon ground cinnamon

3 large eggs, lightly beaten

3/4 cup (180 ml) safflower, corn, or canola oil

1 1/2 teaspoons pure vanilla extract

1 - 8 ounce (227 grams) can crushed pineapple, do not drain

2 cups mashed ripe bananas (3-4 medium sized bananas)

Pecan Cream Cheese Frosting:

1/4 cup (57 grams) unsalted butter, room temperature

8 ounces (227 grams) cream cheese, room temperature

1 pound box (454 grams) (about 3 2/3 cups) powdered sugar, sifted

1 teaspoon (4 grams) pure vanilla extract

1/2 cup (55 grams) finely chopped pecans


Directions:
Preheat oven to 350 degrees F (180 degrees C) and place the rack in the center of the oven. Butter or spray two - 9 x 2 inch (23 x 5 cm) round cake pans and line the bottoms of the pans with a circle of parchment paper.

Place the pecans on a baking sheet and bake in the oven for about 8 minutes or until lightly browned and fragrant. Let cool and then chop finely.

In a large bowl whisk together the flour, sugar, baking soda, salt, and ground cinnamon.

In another large bowl, mix together the eggs, oil, vanilla extract, pineapple, mashed bananas, and finely chopped pecans. Add the wet ingredients to the flour mixture and stir until combined. Evenly divide the batter between the two prepared pans and bake for about 25 to 30 minutes or until a toothpick inserted in the center of the cake comes out clean.

Remove from oven and let cool on a wire rack. After about 10 minutes invert the cakes onto the wire rack, remove the pans and parchment paper, and then cool completely before frosting.

Frosting: In the bowl of your electric mixer (or with a hand mixer), beat the butter and cream cheese, on low speed, until very smooth with no lumps. Gradually add the sifted powdered sugar and beat, on low speed, until fully incorporated and smooth. Scrape down the sides of the bowl as needed. Beat in the vanilla extract and then stir in the finely chopped pecans.

To assemble: place one cake, top side down, onto your serving platter. Spread with about a third of the frosting. Gently place the other cake layer, top of cake facing up, onto the frosting, and spread the rest of the frosting over the top and sides of the cake. Can garnish with pecan halves. Refrigerate the cake for about one hour so the frosting has time to set.

Serves 10 - 12 people.


Hummingbird Cake


This was the dessert I made for the Southern themed dinner hosted by my friend Gina for our dinner group.  This was a really delicious (and surprisingly easy) cake to make.  I thought that I would have tasted the pineapple but perhaps it was just there to provide moisture.  I heard that this is also made with coconut which would have been delicious. I'm not sure why the directions say to add the pecans to the frosting.  That seemed a little strange to me so I just chopped them up and added them around the sides. This was a wonderful dessert that I'd make again!


Ingredients:

1 cup (110 grams) pecans

3 cups (390 grams) all-purpose flour

2 cups (400 grams) granulated white sugar

1 teaspoon baking soda

1/2 teaspoon salt

1 teaspoon ground cinnamon

3 large eggs, lightly beaten

3/4 cup (180 ml) safflower, corn, or canola oil

1 1/2 teaspoons pure vanilla extract

1 - 8 ounce (227 grams) can crushed pineapple, do not drain

2 cups mashed ripe bananas (3-4 medium sized bananas)

Pecan Cream Cheese Frosting:

1/4 cup (57 grams) unsalted butter, room temperature

8 ounces (227 grams) cream cheese, room temperature

1 pound box (454 grams) (about 3 2/3 cups) powdered sugar, sifted

1 teaspoon (4 grams) pure vanilla extract

1/2 cup (55 grams) finely chopped pecans


Directions:
Preheat oven to 350 degrees F (180 degrees C) and place the rack in the center of the oven. Butter or spray two - 9 x 2 inch (23 x 5 cm) round cake pans and line the bottoms of the pans with a circle of parchment paper.

Place the pecans on a baking sheet and bake in the oven for about 8 minutes or until lightly browned and fragrant. Let cool and then chop finely.

In a large bowl whisk together the flour, sugar, baking soda, salt, and ground cinnamon.

In another large bowl, mix together the eggs, oil, vanilla extract, pineapple, mashed bananas, and finely chopped pecans. Add the wet ingredients to the flour mixture and stir until combined. Evenly divide the batter between the two prepared pans and bake for about 25 to 30 minutes or until a toothpick inserted in the center of the cake comes out clean.

Remove from oven and let cool on a wire rack. After about 10 minutes invert the cakes onto the wire rack, remove the pans and parchment paper, and then cool completely before frosting.

Frosting: In the bowl of your electric mixer (or with a hand mixer), beat the butter and cream cheese, on low speed, until very smooth with no lumps. Gradually add the sifted powdered sugar and beat, on low speed, until fully incorporated and smooth. Scrape down the sides of the bowl as needed. Beat in the vanilla extract and then stir in the finely chopped pecans.

To assemble: place one cake, top side down, onto your serving platter. Spread with about a third of the frosting. Gently place the other cake layer, top of cake facing up, onto the frosting, and spread the rest of the frosting over the top and sides of the cake. Can garnish with pecan halves. Refrigerate the cake for about one hour so the frosting has time to set.

Serves 10 - 12 people.


Tuesday, September 6, 2011

Blueberry Ricotta Cake

Found another great recipe from Stacey Snacks.  She found the recipe from the King Arthur Flour website and added some lemon zest to it.  I added the zest to mine too and really loved it. Stacey says to use fresh ricotta but I had some part skim ricotta I wanted to use up in my fridge and it worked just fine.  I'm sure the fresh ricotta will make it even better but don't shy away from trying this if you don't have it.  I prefer eating it at room temperature but when I brought some of it to work some people said they prefer it cold.  So you decide how you like it.  I love the crispy sugar top!


Blueberry Ricotta Cake
from Stacey Snacks

Ingredients:

Batter:
1 cup All-Purpose Flour
3/4 cup sugar
1 1/4 teaspoons baking powder
1/2 teaspoon salt
1/3 cup milk
1/4 cup butter
1 large egg
1/2 teaspoon vanilla
zest of a lemon
3/4 cup fresh blueberries

Topping:
2 large eggs
1 1/4 cups ricotta cheese
1/3 cup sugar
1/4 teaspoon vanilla

Directions:

Preheat the oven to 350°F. Grease a 9 x 9 x 2-inch pan

For the batter: In a small bowl, combine the flour, sugar, baking powder and salt. Add the milk, shortening, egg and vanilla, beating till smooth. Spoon the batter into a greased 9 x 9 x 2-inch pan Sprinkle the blueberries over the batter.

For the topping: In a small bowl, beat the eggs till frothy, then beat in the cheese, sugar and vanilla. Spread this mixture evenly over the blueberries.

Bake the cake for 55 to 60 minutes, or until it's golden brown around the edges. Remove from the oven and cool to lukewarm before serving.

Click here for a printable version of this recipe.


Blueberry Ricotta Cake

Found another great recipe from Stacey Snacks.  She found the recipe from the King Arthur Flour website and added some lemon zest to it.  I added the zest to mine too and really loved it. Stacey says to use fresh ricotta but I had some part skim ricotta I wanted to use up in my fridge and it worked just fine.  I'm sure the fresh ricotta will make it even better but don't shy away from trying this if you don't have it.  I prefer eating it at room temperature but when I brought some of it to work some people said they prefer it cold.  So you decide how you like it.  I love the crispy sugar top!


Blueberry Ricotta Cake
from Stacey Snacks

Ingredients:

Batter:
1 cup All-Purpose Flour
3/4 cup sugar
1 1/4 teaspoons baking powder
1/2 teaspoon salt
1/3 cup milk
1/4 cup butter
1 large egg
1/2 teaspoon vanilla
zest of a lemon
3/4 cup fresh blueberries

Topping:
2 large eggs
1 1/4 cups ricotta cheese
1/3 cup sugar
1/4 teaspoon vanilla

Directions:

Preheat the oven to 350°F. Grease a 9 x 9 x 2-inch pan

For the batter: In a small bowl, combine the flour, sugar, baking powder and salt. Add the milk, shortening, egg and vanilla, beating till smooth. Spoon the batter into a greased 9 x 9 x 2-inch pan Sprinkle the blueberries over the batter.

For the topping: In a small bowl, beat the eggs till frothy, then beat in the cheese, sugar and vanilla. Spread this mixture evenly over the blueberries.

Bake the cake for 55 to 60 minutes, or until it's golden brown around the edges. Remove from the oven and cool to lukewarm before serving.

Click here for a printable version of this recipe.


Monday, August 16, 2010

Ciambella with Summer Berry Compote


Psst - anybody still out there? I sure hope so. It's been a long time. I know, I'm sorry. It is not easy balancing everything I'm working on these days but I am going to really try to start blogging again more regularly. So I'm going to get right to it.

This weekend I made a Ciambella with a Summer Berry Compote for my dinner group. It's a ring shaped cake but it tastes more like a cookie. It tastes similar to the anisette cookies that I make, a one baked biscotti (so it's technically not a biscotti because that means twice baked.) This dessert could not get easier. In fact, I made this years ago and it was one of the first Mario Batali recipes I ever tried. It all gets done in the food processor and pretty much just gets thrown together. That's the kind of dessert I like to make since we all know how often I ruin desserts! lol

The only changes I made to this recipe was that I left out the blackberries. I think it was just as good with the raspberry, blueberry combo. I think I will brush it with an egg wash next time. Just so it looks shiny and pretty. It is pretty rustic looking and I think if I cooked it longer it would have dried it out.
Let me know if you try this!


Ciambella with Summer Berry Compote
by Mario Batali


Ingredients:

1 pint blueberries
1 pint blackberries
1 pint raspberries
Juice of 1/2 lemon
3 tablespoons sugar
2 cups all-purpose flour
1/2 cup sugar
1/2 teaspoon baking powder
8 tablespoons cold sweet butter, cut into 1/2-inch dice plus 1 tablespoon
1 large egg
1 teaspoon almond extract
1/4 cup cold milk


Directions:

Preheat oven to 375 degrees.

In a medium saucepan, combine berries, lemon juice and sugar. Place over medium heat and cook until just boiling, about 5 to 6 minutes. Remove from heat and allow to cool.

Place flour, sugar and baking powder in a food processor and pulse quickly to blend. Add cold butter and pulse quickly until mixture resembles fine bread crumbs. In a separate bowl, beat egg, almond extract and milk until smooth. With food processor going, add liquid all at once and blend 10 to 15 seconds, until just forming a ball. Remove dough from processor to a well-floured cutting board. Shape the dough into a log about 14 inches long and 1-1/2 inches tall. Grease a cookie sheet with the remaining 1 tablespoon butter and lay the log in a round in center. Place in a preheated oven and bake for 30 to 35 minutes, until light golden brown. Remove and allow to cool to room temperature. (I served it cold which I liked better than warm or room temp) Cut into slices about 1-inch thick, top with 2 tablespoons of berry compote and serve.


Click here for a printable version of this recipe.

Ciambella with Summer Berry Compote


Psst - anybody still out there? I sure hope so. It's been a long time. I know, I'm sorry. It is not easy balancing everything I'm working on these days but I am going to really try to start blogging again more regularly. So I'm going to get right to it.

This weekend I made a Ciambella with a Summer Berry Compote for my dinner group. It's a ring shaped cake but it tastes more like a cookie. It tastes similar to the anisette cookies that I make, a one baked biscotti (so it's technically not a biscotti because that means twice baked.) This dessert could not get easier. In fact, I made this years ago and it was one of the first Mario Batali recipes I ever tried. It all gets done in the food processor and pretty much just gets thrown together. That's the kind of dessert I like to make since we all know how often I ruin desserts! lol

The only changes I made to this recipe was that I left out the blackberries. I think it was just as good with the raspberry, blueberry combo. I think I will brush it with an egg wash next time. Just so it looks shiny and pretty. It is pretty rustic looking and I think if I cooked it longer it would have dried it out.
Let me know if you try this!


Ciambella with Summer Berry Compote
by Mario Batali


Ingredients:

1 pint blueberries
1 pint blackberries
1 pint raspberries
Juice of 1/2 lemon
3 tablespoons sugar
2 cups all-purpose flour
1/2 cup sugar
1/2 teaspoon baking powder
8 tablespoons cold sweet butter, cut into 1/2-inch dice plus 1 tablespoon
1 large egg
1 teaspoon almond extract
1/4 cup cold milk


Directions:

Preheat oven to 375 degrees.

In a medium saucepan, combine berries, lemon juice and sugar. Place over medium heat and cook until just boiling, about 5 to 6 minutes. Remove from heat and allow to cool.

Place flour, sugar and baking powder in a food processor and pulse quickly to blend. Add cold butter and pulse quickly until mixture resembles fine bread crumbs. In a separate bowl, beat egg, almond extract and milk until smooth. With food processor going, add liquid all at once and blend 10 to 15 seconds, until just forming a ball. Remove dough from processor to a well-floured cutting board. Shape the dough into a log about 14 inches long and 1-1/2 inches tall. Grease a cookie sheet with the remaining 1 tablespoon butter and lay the log in a round in center. Place in a preheated oven and bake for 30 to 35 minutes, until light golden brown. Remove and allow to cool to room temperature. (I served it cold which I liked better than warm or room temp) Cut into slices about 1-inch thick, top with 2 tablespoons of berry compote and serve.


Click here for a printable version of this recipe.

Tuesday, March 30, 2010

Easy Individual Flan

It's that time again.  My turn for me to make dessert for my dinner group, The Dinner Divas.  I think I am getting better but I still can't help feeling nervous that it's going to turn out awful.  I have to say that although this started off a little shaky, it turned out really well!

I found this recipe at grouprecipes.com.  Although the custard came out excellent the caramel recipe was missing a main ingredient. The recipe stated to melt the sugar in a preheated pan until it melts and becomes caramel.  Well, that just didn't happen.  After speaking with some more experienced bakers, the sugar needed to melt in water to become caramel. What a mess.  My poor all-clad pot was put to the test and I was able to get the sugar out after it hardened in my pot.  It took a while but I saved my precious pot.   Luckily I had caramel sauce and butterscotch sauce (for ice cream) in my fridge and I used that instead.  Turned out fabulous!  The custard was perfect and everyone liked it.  What a surprise, right? Ha ha ha!

I am going to put a link to the recipe if you'd like to see it yourself.  I did leave a comment there so no one has the same issue I did.  Hopefully everyone else knows better or knows to read the comments.  I am going to give you the recipe without the sauce though because I didn't get to try it the right way.  The recipe states that it will fill 6 ramekins.  Maybe they are very large ramekins because I used 8 regular sized ramekins and I had so much of the custard that I threw half of it away.  I would have made another large one but I didn't have enough caramel.  I baked mine for about 1 hour until they were no longer jiggly in the middle. 

Easy Flan Recipe

From GroupRecipes.com

Ingredients: 

Prepared Caramel Sauce
6 large eggs
1/2 cup sugar
1 14oz can sweetened condensed milk
2 - 13 oz cans evaporated milk
1 teaspoon vanilla

Directions:

Preheat oven to 325 degrees.  Pour 2-3 tablespoons caramel into each ramekin, tilting to swirl the caramel around the sides.  Using a hand held mixer, blend the eggs together.  Mix in the milks then slowly add in the sugar and then the vanilla.  Blend until smooth after each ingredient is added.

Pour custard into caramel lined ramekins.  Place ramekins in a large glass or ceramic baking dish and fill with about 1-2 inches of hot water.  Bake for 45 minutes in the water bath and check with a knife just to the side of the center.  If the knife comes out clean, it's ready.  Remove and let cool.  Let each ramekin cool in the refrigerator for 1 hour. Invert each ramkekin onto a small plate, the caramel sauce will flow over the custard. 


Click here for a printable version of Easy Individual Flan.

Easy Individual Flan

It's that time again.  My turn for me to make dessert for my dinner group, The Dinner Divas.  I think I am getting better but I still can't help feeling nervous that it's going to turn out awful.  I have to say that although this started off a little shaky, it turned out really well!

I found this recipe at grouprecipes.com.  Although the custard came out excellent the caramel recipe was missing a main ingredient. The recipe stated to melt the sugar in a preheated pan until it melts and becomes caramel.  Well, that just didn't happen.  After speaking with some more experienced bakers, the sugar needed to melt in water to become caramel. What a mess.  My poor all-clad pot was put to the test and I was able to get the sugar out after it hardened in my pot.  It took a while but I saved my precious pot.   Luckily I had caramel sauce and butterscotch sauce (for ice cream) in my fridge and I used that instead.  Turned out fabulous!  The custard was perfect and everyone liked it.  What a surprise, right? Ha ha ha!

I am going to put a link to the recipe if you'd like to see it yourself.  I did leave a comment there so no one has the same issue I did.  Hopefully everyone else knows better or knows to read the comments.  I am going to give you the recipe without the sauce though because I didn't get to try it the right way.  The recipe states that it will fill 6 ramekins.  Maybe they are very large ramekins because I used 8 regular sized ramekins and I had so much of the custard that I threw half of it away.  I would have made another large one but I didn't have enough caramel.  I baked mine for about 1 hour until they were no longer jiggly in the middle. 

Easy Flan Recipe

From GroupRecipes.com

Ingredients: 

Prepared Caramel Sauce
6 large eggs
1/2 cup sugar
1 14oz can sweetened condensed milk
2 - 13 oz cans evaporated milk
1 teaspoon vanilla

Directions:

Preheat oven to 325 degrees.  Pour 2-3 tablespoons caramel into each ramekin, tilting to swirl the caramel around the sides.  Using a hand held mixer, blend the eggs together.  Mix in the milks then slowly add in the sugar and then the vanilla.  Blend until smooth after each ingredient is added.

Pour custard into caramel lined ramekins.  Place ramekins in a large glass or ceramic baking dish and fill with about 1-2 inches of hot water.  Bake for 45 minutes in the water bath and check with a knife just to the side of the center.  If the knife comes out clean, it's ready.  Remove and let cool.  Let each ramekin cool in the refrigerator for 1 hour. Invert each ramkekin onto a small plate, the caramel sauce will flow over the custard. 


Click here for a printable version of Easy Individual Flan.

Wednesday, February 10, 2010

Chocolate Cupcakes with Cream Cheese Frosting and Coconut

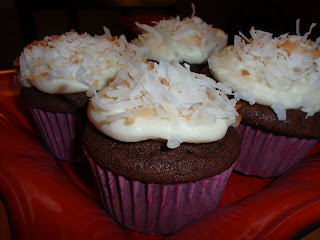
What do you do when you're snowbound?  For me there is something so comforting about staying in and cooking and baking when there's a storm or in this case, a blizzard outside.  It's 6pm and it has been snowing this entire day...in fact, it is still coming down.  I decided to look for a recipe for cupcakes that 1) Steve will enjoy and 2) that I have all the ingredients to make.  I found this cupcake recipe from Martha Stewart.  I decided to use it because it didn't call for special chocolate, just simple cocoa powder.  I think that it could have used some additional chocolate flavoring such as melted chocolate chips (which I had). The flavor was good and they were very moist but it wasn't that chocolaty.  I decided on a cream cheese frosting because I had cream cheese that had to be used this week or I was going to have to toss it.  So there you go!  Oh and the addition of the coconut was simply because I just found out (after 4 years!!!) that Steve really likes coconut.  Who knew?!?  I picked some up last week so I can make him something.  Isn't he lucky? haha


Chocolate Cupcakes
by Martha Stewart, marthastewart.com

Makes 12 Cupcakes


Ingredients:

8 tablespoons (1 stick) unsalted butter, room temperature, plus more for pan
1 1/4 cups all-purpose flour (spooned and leveled), plus more for pan
1/2 cup unsweetened cocoa powder
2 teaspoons baking powder
1/2 teaspoon salt
3/4 cup sugar
2 large eggs, room temperature
1 teaspoon pure vanilla extract
1/2 cup whole milk


Directions:

Preheat oven to 350 degrees. Butter and flour a standard 12-cup muffin pan, or use paper liners. In a medium bowl, whisk together flour, baking powder, and salt; set aside.

With an electric mixer, beat butter and sugar until light and fluffy. Add eggs one at a time, beating well after each addition; add vanilla, and mix until combined. On low speed, beat in half the flour mixture, followed by milk; end with remaining flour mixture. Mix just until incorporated (do not overmix).

Divide batter among prepared muffin cups, filling each 2/3 full. Bake until a toothpick inserted in center of a cupcake comes out clean, 22 to 24 minutes. Cool cupcakes in pan, 5 minutes; transfer to a wire rack to cool completely. Frost with your choice of icing.


Cream Cheese Frosting
by Martha Stewart, marthastewart.com

Ingredients:

8 ounces (2 sticks) unsalted butter, room temperature
12 ounces cream cheese, room temperature
1 pound (4 cups) confectioners' sugar, sifted
3/4 teaspoon pure vanilla extract

Directions:

Beat butter and cream cheese with a mixer on medium-high speed until fluffy, 2 to 3 minutes. Reduce speed to low. Add sugar, 1 cup at a time, and then vanilla; mix until smooth. Frosting can be refrigerated for up to 3 days; before using, bring to room temperature, and beat until smooth.

Frost cupcakes and top with toasted coconut.  

Note :  I used a makeshift piping bag (freezer bag) to put the frosting on and it was fun.  It was my first time doing it and I'm definitely awkward when it comes to decorating cakes and cupcakes but you get the idea.



Chocolate Cupcakes with Cream Cheese Frosting and Coconut

What do you do when you're snowbound?  For me there is something so comforting about staying in and cooking and baking when there's a storm or in this case, a blizzard outside.  It's 6pm and it has been snowing this entire day...in fact, it is still coming down.  I decided to look for a recipe for cupcakes that 1) Steve will enjoy and 2) that I have all the ingredients to make.  I found this cupcake recipe from Martha Stewart.  I decided to use it because it didn't call for special chocolate, just simple cocoa powder.  I think that it could have used some additional chocolate flavoring such as melted chocolate chips (which I had). The flavor was good and they were very moist but it wasn't that chocolaty.  I decided on a cream cheese frosting because I had cream cheese that had to be used this week or I was going to have to toss it.  So there you go!  Oh and the addition of the coconut was simply because I just found out (after 4 years!!!) that Steve really likes coconut.  Who knew?!?  I picked some up last week so I can make him something.  Isn't he lucky? haha


Chocolate Cupcakes
by Martha Stewart, marthastewart.com

Makes 12 Cupcakes


Ingredients:

8 tablespoons (1 stick) unsalted butter, room temperature, plus more for pan
1 1/4 cups all-purpose flour (spooned and leveled), plus more for pan
1/2 cup unsweetened cocoa powder
2 teaspoons baking powder
1/2 teaspoon salt
3/4 cup sugar
2 large eggs, room temperature
1 teaspoon pure vanilla extract
1/2 cup whole milk


Directions:

Preheat oven to 350 degrees. Butter and flour a standard 12-cup muffin pan, or use paper liners. In a medium bowl, whisk together flour, baking powder, and salt; set aside.

With an electric mixer, beat butter and sugar until light and fluffy. Add eggs one at a time, beating well after each addition; add vanilla, and mix until combined. On low speed, beat in half the flour mixture, followed by milk; end with remaining flour mixture. Mix just until incorporated (do not overmix).

Divide batter among prepared muffin cups, filling each 2/3 full. Bake until a toothpick inserted in center of a cupcake comes out clean, 22 to 24 minutes. Cool cupcakes in pan, 5 minutes; transfer to a wire rack to cool completely. Frost with your choice of icing.


Cream Cheese Frosting
by Martha Stewart, marthastewart.com

Ingredients:

8 ounces (2 sticks) unsalted butter, room temperature
12 ounces cream cheese, room temperature
1 pound (4 cups) confectioners' sugar, sifted
3/4 teaspoon pure vanilla extract

Directions:

Beat butter and cream cheese with a mixer on medium-high speed until fluffy, 2 to 3 minutes. Reduce speed to low. Add sugar, 1 cup at a time, and then vanilla; mix until smooth. Frosting can be refrigerated for up to 3 days; before using, bring to room temperature, and beat until smooth.

Frost cupcakes and top with toasted coconut.  

Note :  I used a makeshift piping bag (freezer bag) to put the frosting on and it was fun.  It was my first time doing it and I'm definitely awkward when it comes to decorating cakes and cupcakes but you get the idea.


Thursday, January 21, 2010

Light Banana Bread


I love my mom's banana bread. I really, really do BUT it's not the most healthy recipe out there, even though I try to convince myself that if it has fruit, it's healthy. I had some bananas that were too overripe to put in my cereal so I googled "Light Banana Bread Recipes" and I came across this one at Cheap Healthy Good.  She found the recipe at cooking light and she made some adjustments.  I followed her changes but did add about 1/2 cup of semi sweet chocolate chips and I used a bundt pan instead.  Not sure how that works with the suggested portion sizes and all but I am okay with that.  Anway, let me get to the taste.  I tasted this when it was warm and I thought it was a little weird tasting but when I tasted it the next day it was fine.  The flavor is good, it's just the consistency that is different which I'm guessing is from using egg whites.  Bottom line, for a low fat recipe, it's great, I'll make it again.  When I fall of the healthy eating bandwagon....I'm going back to Mom's.

Light Banana Bread
Adapted from Cooking Light by Cheap Healthy Good

Ingredients:

2 cups all-purpose flour
1 teaspoon baking soda
1/2 teaspoon salt
½ teaspoon cinnamon
¼ teaspoon nutmeg
2/3 cup sugar
2-1/2 T butter, softened
1 1/2 cups mashed ripe banana (about 4 bananas)
3 T skim milk
3 T fat-free sour cream or vanilla yogurt
2 large egg whites
½ t vanilla extract
Cooking spray


Directions:

1) Preheat oven to 350°F. Coat loaf pan with cooking spray.

2) In a large bowl, mix together flour, baking soda, salt, cinnamon, and nutmeg. Set aside.

3) In a different large mixing bowl OR stand mixer bowl, combine sugar and butter. "Beat at medium speed of a mixer until well-blended." Stop beater. Add banana, milk, sour cream, and egg whites. Resume beating until well combined.

4) Pour flour mixture into banana mixture and beat until everything is well-blended.

5) Pour batter into loaf pan. Bake 60 or 70 minutes, or until loaf passes the toothpick test. (Insert a toothpick in the middle of the bread. If it comes out clean, you're golden.) Remove from oven. (SEE NOTE BELOW) Let sit for 10 minutes on a wire rack. Pry bread from pan and let it cool totally on that same wire rack. For best flavor, wrap in tin foil and let sit overnight.

Note: If using a bundt pan - bake for approx 45 minutes or until a toothpick comes out clean.  Let cool and invert. 

Click here for a printable recipe for Light Banana Bread.

Light Banana Bread


I love my mom's banana bread. I really, really do BUT it's not the most healthy recipe out there, even though I try to convince myself that if it has fruit, it's healthy. I had some bananas that were too overripe to put in my cereal so I googled "Light Banana Bread Recipes" and I came across this one at Cheap Healthy Good.  She found the recipe at cooking light and she made some adjustments.  I followed her changes but did add about 1/2 cup of semi sweet chocolate chips and I used a bundt pan instead.  Not sure how that works with the suggested portion sizes and all but I am okay with that.  Anway, let me get to the taste.  I tasted this when it was warm and I thought it was a little weird tasting but when I tasted it the next day it was fine.  The flavor is good, it's just the consistency that is different which I'm guessing is from using egg whites.  Bottom line, for a low fat recipe, it's great, I'll make it again.  When I fall of the healthy eating bandwagon....I'm going back to Mom's.

Light Banana Bread
Adapted from Cooking Light by Cheap Healthy Good

Ingredients:

2 cups all-purpose flour
1 teaspoon baking soda
1/2 teaspoon salt
½ teaspoon cinnamon
¼ teaspoon nutmeg
2/3 cup sugar
2-1/2 T butter, softened
1 1/2 cups mashed ripe banana (about 4 bananas)
3 T skim milk
3 T fat-free sour cream or vanilla yogurt
2 large egg whites
½ t vanilla extract
Cooking spray


Directions:

1) Preheat oven to 350°F. Coat loaf pan with cooking spray.

2) In a large bowl, mix together flour, baking soda, salt, cinnamon, and nutmeg. Set aside.

3) In a different large mixing bowl OR stand mixer bowl, combine sugar and butter. "Beat at medium speed of a mixer until well-blended." Stop beater. Add banana, milk, sour cream, and egg whites. Resume beating until well combined.

4) Pour flour mixture into banana mixture and beat until everything is well-blended.

5) Pour batter into loaf pan. Bake 60 or 70 minutes, or until loaf passes the toothpick test. (Insert a toothpick in the middle of the bread. If it comes out clean, you're golden.) Remove from oven. (SEE NOTE BELOW) Let sit for 10 minutes on a wire rack. Pry bread from pan and let it cool totally on that same wire rack. For best flavor, wrap in tin foil and let sit overnight.

Note: If using a bundt pan - bake for approx 45 minutes or until a toothpick comes out clean.  Let cool and invert. 

Click here for a printable recipe for Light Banana Bread.

Wednesday, December 30, 2009

Cinnamon Sugar Muffins


It looks like these little muffins are making their way around the blogosphere.  I saw them on Cooking with LT about a week and a half ago and she got them from Cook with Sara.  They are so cute and I had all the ingredients so I knew I could make them some time between Christmas and New Year's eve and I did.  I only keep skim plus milk on hand and wasn't sure if that would be okay.  After reaching out to my friends on Bakespace and facebook, I was assured that they would be just find....and they were!  Like Laura says, they make more mini muffins/cupcakes than 24 which is what the original poster stated. The more the better, don't you think?  If you're looking for an easy, yummy and cute recipe you should definitely try these.


Cinnamon Sugar Mini Muffins (that taste like cupcakes!)

from Cooking with LT

Ingredients:

Muffins:

3/4 cup sugar
1 egg
1 1/2 cups flour
2 tsp. baking powder
1/4 tsp. salt
1/4 tsp. nutmeg
1/4 cup vegetable oil
1 tsp. vanilla
3/4 cup milk

Topping:

1 Tbsp. butter, melted (I needed a bit more)
1/4 cup sugar
1 1/2 tsp. cinnamon


Directions:

1) In a mixing bowl, beat together egg and sugar until fluffy. Add the flour, baking powder, salt and nutmeg; beat just until combined (the mixture will be crumbly).

2)In a measuring cup, combine milk, oil and vanilla; add to flour mixture and mix well.

3) Pour into muffin cups or mini muffin cups lined with papers or sprayed with nonstick cooking spray. Bake at 350 for 15 minutes or until toothpick comes out clean.

4) Cool for 10 minutes. Combine cinnamon and sugar in a small bowl. Melt butter in a second small bowl. When muffins are cool enough to handle, remove from muffin pans and dip muffin tops in melted butter, then in cinnamon sugar mixture.