Wednesday, April 29, 2009

My Head to Toe Makeover courtesy of The Blog Fairy!

So what do you think of my new look? I am very excited about it! If you receive my blog in your inbox (Mom, Dad, that means you guys!) please click here to check things out.

I want to send out a huge Thank you and hugs to Emily of The Blog Fairy! She was so patient and helpful! If you're looking for a blog makeover go check her out, she is a pleasure to work with!


The Blog Fairy

Tuesday, April 28, 2009

Spaghetti with Olives and Bread Crumbs

Photobucket


Have you noticed that I love olives? They aren't just for salads, I assure you. I'm always throwing kalamata olives into my of my dishes. I just love the salty kick that they give. Most of the time you can leave the olives out if you don't like them but in this dish I think you would really be missing something if you didn't use them. I watched Giada De Laurentiis make this recipe a while ago and it went into my mental rolodex of recipes that I must try. I thought about it yesterday when looking for something quick to make for dinner. I went to The Food Network and pulled up Giada's recipe. WARNING : The next paragraph is a rant, skip to recipe if you don't want to hear it.

I read the reviews and had myself a good laugh. I apologize ahead of time if I'm coming off mean or as a food snob. I really don't mean to but it just amazes me how critical people can be. So for those people who gave this recipe a bad review...If you don't like olives why would you want to make this dish? You obviously wouldn't like it so why ruin it for others that might like it? That's the same as me knowing that I don't like shrimp and then cooking it anyway and then giving it a bad review because no matter what the recipe is if there's shrimp in it I'm not going to like it. It's just not right. Oh and if you are going to use canned salad olives it's going to be awful but why would you do that if you read the recipe or watched the show? Stepping off my soap box now.

Anyway, sorry about that little rant, it just upsets me. The recipe is great! I changed it up slightly but not because it wasn't good but because I like to make things that suit my tastes and my style of cooking.

If you want to see the original recipe click here.

Here is the recipe with my alterations.

Ingredients:

1 pound spaghetti
1/2 tbsp butter
Approx 2/3 cup extra-virgin olive oil (use less you can always add more)
3/4 cup seasoned dried bread crumbs
2 cloves garlic, minced
1 tsp. crushed red pepper flakes
3/4 cup pitted and roughly chopped kalamata olives
3/4 cup pitted and roughly chopped large green sicilian olives
1/3 cup freshly grated Parmesan
1/4 cup chopped fresh flat-leaf parsley

Directions:

Bring a large pot of salted water to a boil. Add the pasta and cook, stirring occasionally, until tender but still firm to the bite, about 8 minutes.

Meanwhile, in a large saute pan, heat the oil over medium-high heat. Add garlic, red pepper and the bread crumbs. Stirring constantly, cook the breadcrumbs until golden brown, about 2 minutes.

Drain the pasta, reserving 1 cup of the pasta water. Stir the pasta into the bread crumb mixture. Remove the pan from the heat and add the black and green olives. Add the Parmesan cheese and 3 tablespoons of the parsley. Gently toss to coat, adding reserved pasta water a little at a time to loosen the pasta. Transfer to a large serving bowl and garnish with the remaining parsley.

Enjoy!

Photobucket

Photobucket

Photobucket

Photobucket


Monday, April 27, 2009

Two Fabulous Sides - Oven Roasted Broccoli and Oven Roasted Potatoes

Photobucket

Photobucket
These are the two sides I served with my Chicken Cordon Bleu. I know I promised to post it the next day. I'm really late with this one! Sorry about that!

I was very excited when I saw a bag of mixed baby potatoes in the supermarket last week. There were baby red, fingerling, yukon gold and purple potatoes in the sack. I prepared them quite simply and I'm glad I did. The potatoes were creamy and had a great flavor on their own.

Since I was already turning on the oven at a high temperature I figures I might as well try roasting the broccoli as well. It seems to be a new trend on the food network and I have been meaning to give it a shot. The temperature may have been slightly too high for the broccoli or maybe I should have taken them out a bit sooner as some of them burned...um...I mean caramelized. Luckily, the broccoli still tasted great! When you make it check your broccoli after 10 minutes to check for desired doneness. I will make this again and get a more accurate cooking time.

Roasting is a great method for cooking veggies with little effort and lots of flavor. If you need another reason, it makes for a night of easy cleanup! My stovetop remained clean!


Photobucket


Oven Roasted Potatoes

Ingredients:

1 bag of mixed baby potatoes
4 cloves of garlic, cracked
Kosher salt and Pepper, to taste
Approx. 2 tbsp. extra virgin olive oil
2 tablespoons chopped fresh parsley

Directions:

1. Scrub potatoes and pat dry. Spread out on in a roasting pan or a cookie sheet. Something that is large enough that the potatoes aren't touching.

2. Season potatoes with oil, salt, pepper and garlic and toss around with clean hands. Spread out.

3. Bake at 400 for about 30 minutes or until a knife easily pierces the potatoes. Shake the pan a couple of times to make sure that they aren't sticking and are getting evenly browned.

4. Toss with parsley. Serve hot or at room temperature.


Photobucket


Oven Roasted Broccoli

Ingredients:

2 bunches broccoli, trimmed of most of the stem and cut into florets.
3-4 cloves garlic, chopped
Approx. 2 tablespoons of extra virgin olive oil (I tend to go back and add more)
1 teaspoon crushed red pepper flakes
kosher salt

Directions:

1. Toss broccoli with oil, salt, pepper and garlic and spread in a roasting pan or cookie sheet.

2. Cook for 10-15 minutes at 400 or until desired tenderness is reached.

Options:

Add some grated romano or parmesan cheese when it comes out of the oven.
Toss with browned bread crumbs (or bread crumbs and cheese).
Squeeze some fresh lemon juice on top just before serving.

Wednesday, April 22, 2009

Oreo Truffles

Photobucket

As you all know I had my wisdom teeth extracted last week. I had a great experience thanks to Dr. Pirozzi, Dr. Ernst and the wonderful staff at The Center for Oral Surgery in Montville, NJ. Their smiling and welcoming faces made me comfortable from the moment I stepped through the door. I don't know about your experiences but I never seem to come in contact with many friendly faces at the offices I have been to. Usually they don't even look up from their work, speak in a monotone voice and have miserable looks on their faces. That is not the way this group is at all. They gladly answered all my questions (and I had many) and made me comfortable. This made a huge impression on me and I wanted to show them my appreciation. Since I was going to the office for my post-op appointment I decided to make them some oreo truffles. These fabulous little chocolate candies have been circulating bakespace and most food blogs for months. I'm pretty sure everyone has tried making them once. They are so easy and are very pretty. You can get creative by drizzling some white chocolate on top, topping them with colored sprinkles or other candies. It's completely up to you.

So here's a big THANK YOU to my new friends! Hope you all enjoyed the truffles!


Oreo Truffles

Ingredients:

1 pkg. (1 lb. 2 oz.) OREO Cookies, finely crushed, divided
1 pkg. (8 oz.) PHILADELPHIA Cream Cheese, softened
2 pkg. (8 squares each) BAKER'S Semi-sweet chocolate, melted


Directions:

MIX 3 cups of the cookie crumbs and the cream cheese until well blended. Shape into 42 (1-inch) balls.

DIP balls in melted chocolate; place on waxed paper-covered baking sheet. (Any leftover melted chocolate can be stored in tightly covered container at room temperature and saved for another use.) Sprinkle with remaining cookie crumbs.

REFRIGERATE 1 hour or until firm. Store any leftover truffles in tightly covered container in refrigerator.


Here are some tips:

1 - If you use the entire package of oreos you will have leftover oreo crumbs, save these in a ziplock bag and use them to top ice-cream or to top cupcakes.

2 - Refrigerate oreo balls before dipping them in chocolate so they stay nice and firm.

3 - You will have a lot of chocolate leftover. Don't be tempted to make these the next time with less chocolate (I did) because it makes it difficult to cover with chocolate.


Photobucket

Monday, April 20, 2009

Chicken Cordon Bleu with Roasted Potatoes and Roasted Broccoli

Photobucket

Well it's been a damp and rainy day here in Northern New Jersey so I thought it would be nice to turn on the oven and warm things up a bit. This entire meal was made in the oven! So nice not to have to scrub my stove for once.

I watched Tyler Florence make Chicken Cordon Bleu last week and his presentation is what really got me excited. I've made many different versions of Cordon Bleu but I just found my new favorite. I'll admit I'm not entirely happy with how my chicken looked compared to Tyler's but I think if I practice this method I will get better at it. So what's different, you ask? Tyler used plastic wrap to roll up his chicken jelly roll style and then twist off the ends so it looked like a compact little stuffed sausage. This eliminates the need for toothpicks and is an alternative to folden your chicken booklet style. My rolls were fatter which was probably because I didn't pound it thin enough and it took some handling for me to get the chicken rolled tight, not quite as easy as it looked on television but definitely worth trying and mastering. I wish I took a better picture, my creative juices were on low tonight and I just couldn't arrange the chicken well. More things to learn (but that certainly is one of the great things about this blog, I get lots of practice) and I'm taking it one day at a time.

I used Tyler's method but added my own flair to the dish. Instead of using Gruyere cheese I used delis sliced Provolone. I seasoned the panko breadcrumbs with garllic powder, romano cheese, Mrs. Dash Table Blend (I love that stuff!), thyme, paprika, salt and pepper. I skipped the Chicken Jus because I just don't have that kind of time on a week night but I would absolutely love to try it on a weekend.

Click here to see Tyler's Original Recipe.


Photobucket

Michele's Chicken Cordon Bleu
Adapted from Tyler Florence

Serves 2

Ingredients:

2 chicken breasts skinless and boneless
4 thin slices prosciutto di Parma
4 thin slices provolone
1/4 cup all-purpose flour
Kosher salt and freshly ground black pepper
Approx 1/2 cup panko bread crumbs
1 tsp dried thyme
1 tsp garlic powder
1 tsp Mrs. Dash Table Blend
1 tsp paprika
romano cheese, to taste
1 tablespoons unsalted butter, melted
1 eggs
Extra-virgin olive oil


Directions:

Preheat oven to 350 degrees F.

Lay the chicken breast between 2 pieces of plastic wrap. Using the flat side of a meat mallet or heavy bottomed pan, gently pound the chicken to 1/4-inch thickness. Remove the top sheet of plastic and lay 2 slices of prosciutto neatly over the top to cover the breast and then lay 2 slices of provolone over that. Tuck in the sides of the breast and roll up tight like a jellyroll inside the plastic wrap. Squeeze the log gently to seal and twist both ends tight to form a nice log. Repeat with remaining chicken. Refrigerate chicken for 20-30 minutes.

Season the flour with salt and pepper. Mix the bread crumbs with thyme, garlic and kosher salt, pepper, Mrs. Dash, paprika, romano cheese and melted butter. The butter will help the crust brown. Season flour with salt and pepper. Beat egg with a splash of water.

Remove the plastic wrap. Lightly dust the chicken with flour, dip in the egg mixture and gently coat in the bread crumbs. Lightly coat a baking pan with olive oil and carefully transfer the roulades onto it. Bake for 20 to 25 minutes until browned and cooked through. The size and thickness of your chicken determines how long you will need to cook it. I cooked mine for 30 minutes and it was perfect.

Come back tomorrow to see the recipes for Roasted Broccoli and Roasted Baby Potatoes.


In case you get this blog delivered to your email or in a feed and haven't noticed, I am now on Twitter. Click here to follow me!

Sunday, April 19, 2009

Tiffany's Sour Cream Pancakes

Photobucket

Hi everyone! I'm back! Thanks for all your well wishes! I'm feeling much better now. Still slightly sore but I can chew more things now, thank God! I was going out of my mind eating eggs and pudding and mac and cheese every day.

This morning I decided to pull out a recipe for pancakes that was given to me years ago by my cousin Tiffany. I used the recipe once before and really liked it but I put it away and forgot about it since I don't get the chance to make breakfast that often. Well, let me tell you, I will definitely be making these again soon! They were so delicious and definitely worth the effort of making them from scratch. They aren't the most figure friendly since they are loaded with butter but I instead of using whole milk I used skim plus. I had some reduced fat sour cream leftover and I had a new container of full fat sour cream so I used both. It turned out perfectly so I wouldn't worry about making swaps.


Pancakes

2 Cups all-purpose flour
½ cup sugar
2 tsp baking powder
1 tsp baking soda
½ tsp salt
1 ½ cups milk
1 cup sour cream
2 eggs
6 Tablespoons unsalted butter
1 Tablespoon Lemon Juice

Whisk together the flour, sugar, baking powder, baking soda and salt. In another bowl, whisk together the milk, sour cream, eggs, melted butter, lemon juice. Pour the milk mixture into the flour and stir until combined. Batter will be lumpy.

Brush griddle with olive oil over medium heat and make the pancakes like you normally would.

Makes approx 20 pancakes


My cousin Tiffany has her own business making custom window treatments. She is extremely talented and constantly impresses me with her creations. Please check out her website www.tanahome.com. Thanks guys!

Tuesday, April 14, 2009

Just a note

Just wanted to let you all know that I'm not going to be able to post for a few more days. I had all four wisdom teeth taken out yesterday. That means only soft foods for me...boring! Don't think you want to see a photo of my scrambled eggs and pudding. :-) I will be back soon!

Hope you all had a wonderful Easter and Passover!

Thursday, April 9, 2009

My Italian Grandmother goes Mexican - Chicken Enchiladas with Salsa Verde

Photobucket


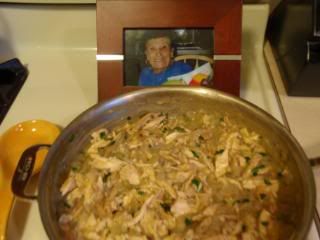
I'm not going to lie. My Italian Grandmother would probably never have gone Mexican. She wasn't into eating any cuisines other than Italian. Chinese food was the only acception and that was pretty much limited to lo mein, wonton soup and chicken with broccoli. She was old school, what can I say. I thought it would be nice for her to watch me though, so I brought her (photo) into the kitchen with me.

I'm usually a big cheater when it comes to Mexican dishes. I'm not afraid to admit that I've made tacos from a box or enchiladas with a seasoning pack. Honestly, it's fine for me because Mexican food isn't as near and dear to my heart as Italian food is. You'll never catch me cheating there (unless it's with a jar of roasted peppers or canned beans), I always make my sauce from scratch because that's what I know and it comes easy to me. Tonight I thought it would be nice to make enchiladas the real way. Okay, I did cheat a little but I work full time and I don't like eating very late at night. If you need more excuses, let me me know! ;-)

I picked up some tomatillos during my Fairway excursion on Friday. I have seen Chef's on The Food Network use them many times and I have been quite curious. I am pleased to say that I am definitely a fan! This salsa was the perfect combination of tangy and spicy. I did leave out the cilantro because it just hasn't grown on me yet. I can deal with it in small doses but I didn't see the point in buying a whole bunch if I'm only going to use a little bit. My cheating came from using a store bought rotisserie chicken. It's what the recipe called for and I was more than happy to oblige. You can use any leftover chicken for this recipe or you can poach a bit of your own with some cumin and any spices you like.

The recipe called for 10 large flour tortillas. I bought the biggest I could find and I made four of them and the rest I put in the fridge for tomorrow. I would have cooked them all but I didn't have enough tomatillo salsa or cheese. I bought 5 tomatillos so that was probably a little less than a pound so it would have made more sauce if I had the full pound but I can't imagine it making that much of a difference. I used one bag of shredded Mexican cheese and I could have used more to top the four that I made and I don't think I was heavy with the cheese. So keep that in mind if you do make this recipe from the original. I almost forgot...I was lazy and I did not toast the tortillas. Don't be like me! Steve thought they would be better if toasted and I trust him with this! I would definitely make this again. Maybe I would even make the salsa and freeze it or refrigerate it for use at a later date.

You can find this recipe in it's entirety here.


Chicken Enchiladas with Roasted Tomatillo Salsa
Adapted from Tyler Florence

Salsa

Ingredients:

5 tomatillos, husked
1 white onion, peeled, sliced, quartered or whole
4 garlic cloves
2 jalapenos
2 teaspoons ground cumin
1 teaspoon salt
1/2 cup chopped cilantro leaves or parsley
1/2 lime, juiced


Directions:

Preheat oven to 400 degrees F.

On a baking tray, roast tomatillos, onion, garlic and jalapenos for 12 to 15 minutes. Transfer the roasted vegetables and any juices on the bottom of the tray to a food processor. Add the cumin, salt, cilantro, and lime juice and pulse mixture until well combined but still chunky.


Enchiladas:

Extra-virgin olive oil
1/2 medium onion, diced
3 garlic cloves, chopped
1 1/2 teaspoon ground cumin
1/4 cup all-purpose flour
2 cups chicken stock, storebought
Chopped cilantro leaves or parsley
1 deli roasted chicken (about 3 pounds), boned, meat shredded
Salt
4 large (burrito size) flour tortillas
1 package of shredded 4 cheese Mexican cheese mix (plus a little more if you like it cheesy)
sour cream, for serving
Chopped tomatoes and cilantro leaves, for garnish

Directions:

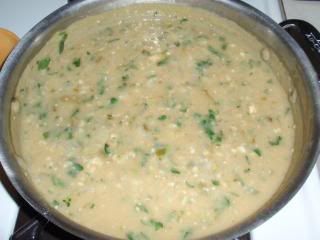
Heat olive oil in a medium saucepan over medium heat. Add the onion and cook until soft and caramelized - this should take 5 to 7 minutes. Add the garlic and cumin then cook for a further minute. Add the flour and stir to ensure the flour doesn't burn then gradually add the chicken stock. Continue stirring over a low simmer until the flour cooks and the liquid thickens. Turn off the heat, add half of the roasted tomatillo chile salsa, some additional fresh chopped cilantro and fold in the shredded chicken meat. Season, to taste, with salt and pepper.

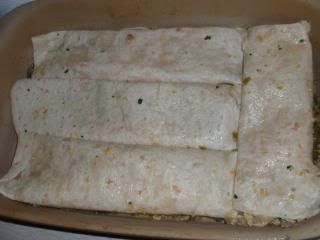
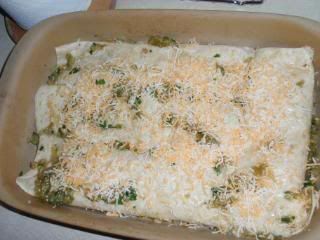
Turn oven temperature down to 350 degrees F and begin assembling the dish. Take a large baking dish and smear the bottom with some of the reserved tomatillo salsa. Now take the flour tortillas and briefly flash them over the stove-top flame (or put them briefly under the broiler if using an electric stove). Using a shallow bowl, coat each tortilla lightly with the reserved salsa mix. Put a scoop of the shredded chicken-enchilada mix on top of the tortilla followed by a sprinkle of the shredded cheese. Fold the tortilla over the filling and roll like a cigar to enclose it. Using a spatula place the tortillas in the baking dish and continue to do the same with all the tortillas. Finally pour over some more of the salsa and top with the remaining shredded cheese. Bake uncovered for about 30 minutes until bubbly and cracked on top. Garnish, cilantro and tomato and sour cream.

Photobucket

Photobucket

Photobucket

Photobucket

Photobucket

Photobucket

Photobucket

Wednesday, April 8, 2009

Grilled Lemon Chicken and Crazy Brown Rice

Photobucket


If you're looking for something quick, easy and tasty for a weeknight meal look no further. Serve with a salad and you have a very tasty, healthy meal. Chicken cutlets cook up very quickly but you could also use chicken breasts and they will cook up pretty fast as well. My chicken cutlets were pretty small so I didn't need to use a lot of liquid. If you use breasts you may want to increase the amount of lemon juice.

Crazy Brown Rice...weird name, isn't it? That's the nice version of what Steve suggested I call it. Oh, he liked it, don't worry he just felt like busting my chops! The brown rice is something new that I bought from Trader Joe's. The rice comes in a box with three packages of two servings each. There are two ways to cook it, microwaved in the bag it comes in (like those veggies in a steamer bag)or in a pot on the stove top. I cooked it on the stove for about 10 minutes. If you have another brand of brown rice feel free to use it. You can use white rice as well. I was trying to be healthy and get Steve to try something new.

So here you have it. Grilled Lemon Chicken with Crazy Brown Rice. Delicious!


Grilled Lemon Chicken

Ingredients:

1 package thin sliced chicken cutlets
1 lemon, zested and juiced
1 tsp minced garlic
1/4 cup fresh parsley, chopped
2 tbsp olive oil
1 tsp Italian seasoning
1 tsp Mrs. Dash Table Blend
salt and pepper, to taste

Directions:

Combine, lemon juice and zest, garlic, parsley, olive oil, Italian Seasoning, salt and pepper in a bowl, add chicken and allow each piece to get coated with mixture. Let chicken marinate for one hour.

Heat grill pan and drizzle with a little oil or cooking spray. Cook chicken on both sides until browned and cooked through.


Crazy Brown Rice

Ingredients:

1 package of Trader Joe's frozen brown rice (2 serving package)
1 small onion, chopped
2 cloves garlic, minced
1/2 zucchini or 1 small baby zucchini
2 campari tomatoes, chopped
approx. 1/4 cup diced red bell pepper
a splash of dry white wine
extra virgin olive oil
salt and pepper, to taste
1/4 cup parsely, chopped


Directions:

Cook Rice according to package directions. While rice is cooking saute onions and garlic in oil. Add

Meanwhile, saute onions, peppers and garlic in olive oil. Once softened add zucchini and let cook for about 5 minutes. Add tomatoes and let them cook down, about 3-4 minutes, add wine and reduce, season with salt, pepper and parsley. Add cooked brown rice and toss with veggie mixture. Add more oil if it seems dry. I can't believe I forgot to take a picture of the rice before I arranged it on the plate. I really thought I did but the picture is nowhere to be found so I guess I didn't. Sorry!


Photobucket

Photobucket

Photobucket

Photobucket

Photobucket

Tuesday, April 7, 2009

Pasta with Sausage and Broccoli Rabe Meets Stuffed Peppers...and they fell in love.

Photobucket


I couldn't resist the beautiful red bell peppers that Fairway had on sale for .99/lb last week. I bought four of them and they were all uniform in size, perfect for stuffing. I've shared my recipe for Stuffed Peppers with you already so I wanted to try something unique. I had some broccoli rabe leftover from my mom's birthday dinner and thought the bright green would look great with the red peppers. For some reason though, I can't think of broccoli rabe without also thinking of sausage, it's such a popular combination in Italian cooking. I've shared my recipe for Pasta with Sausage and Broccoli rabe already as well but I thought that this could be different. After some thinking and messing around in my fridge, freezer and pantry I decided to make Stuffed Peppers with Orzo, Sweet Italian Sausage and Broccoli Rabe. I am so very happy I tried this out. I loved it! Steve did too, even though he never really likes to eat the pepper, no matter how I make it. I did have a lot of extra filling so his second helping was the fillng minus the pepper. That itself could make a great meal or side dish.

Keep in mind, if you are making the broccoli rabe specifically for this dish I would save it for the weekend. It could end up taking some time. Since it needs to be boiled, shocked in cold water and then sauteed with garlic and oil. If you want to know how to prepare broccoli rabe for this dish please follow the link to my previous post.


Ingredients:

6 red bell peppers (I used four but had enough filling for 6)
1/2 pound of orzo
3 links of sweet Italian sausage, removed from casing
1 small onion, diced
4-5 cloves garlic, finely chopped
1/4 cup dry white wine
1-15 oz can tomato sauce (such as Delmonte or Contadina)
Approx 1 - 1 1/2 cups prepared broccoli rabe, chopped
1/4 cup pignoli nuts, toasted
1 tomato, seeded and chopped
extra virgin olive oil
1/2 cup romano or parmigiano cheese plus extra for grating on top
2 teaspoons basil, frozen, fresh or dried
salt and pepper

Directions:

1. Boil orzo in salted water for 7 minutes. Orzo will still be slighly tough but they will continue to cook inside the pepper. Drain well and toss with oil. Set aside in a bowl or cookie sheet to cool.

2. While pasta is cooking, prepare peppers. Remove tops and reserve for another use (such as salad), remove ribs and seeds and rinse. Cut a small slice off the bottom of the peppers. Do not cut a thick slice because we do not want the filling to fall through. You want the slice to be thick enough to make some holes for the sauce to come through and to keep the pepper from falling over. Chop up those slices and reserve. Sprinkle inside of peppers with salt and pepper.

3. In a deep pan or chicken fryer (you need to be able to fit the peppers in the pan with the lid on) Saute sausage in some oil, breaking it with a spoon or potato masher. Try to get the pieces as small as you can. Remove sausage and set aside.

4. In the same pan saute onion and garlic in drippings. Add the basil, chopped pepper and tomato. Season with salt and pepper. Once vegetables are softened add wine and let it cook down for about 5 minutes. Remove from heat.

5. In a large bowl combine orzo, sausage, broccoli rabe, pignoli nuts, softened veggie mixture, and cheese. Taste and add salt and pepper if needed.

6. Fill peppers with mixture. Heat the same pan and add a little oil. Place peppers into the pan and let them cook for a few minutes. Add tomato sauce and season it with salt and pepper. Cover and let come to a boil. Reduce heat to low and let simmer for 40 minutes or until peppers are fork tender. Sprinkle cheese on top and serve with some sauce on the plate and over the peppers.

Enjoy!


Photobucket


Photobucket

Photobucket

Photobucket

Photobucket

Monday, April 6, 2009

Fairway Market - Is it worth the hype?

If you live in New Jersey you have heard all the hype about Fairway Market opening up a location in Paramus. I have been waiting for months for this even though I've never been to a Fairway location before. Friday I left work early and drove from Morris Plains to Paramus in severe rain and wind. I was a woman on a mission. From the moment I parked my car (on the opposite end of the parking lot)to the moment I walked through the doors I was like a giddy child going to a candy store. Well, in a mere 5 minutes I went from giddy and childlike to overwhelmed and all business. I had to push my way through old ladies who stopped in the middle of the aisles and abandoned their carts, kids who walked without looking where they were going and the mass of people looking for the best deals. It was like an obstacle course of women, children and little old ladies. I felt like I was in a zoo. Granted, Fairway only opened a week and a half earlier but I still was not prepared for the crowd.

Okay,on to the important stuff, the produce section was everything I imagined. It was huge, they had every variety of apples you could think of, tomatoes of all shapes, sizes and colors, basil so fragrant it reminded me of summer. There were red, green, yelIow and orange bell peppers, poblanos, jalapenos, cubanelles. It was beautiful. Unfortunately, some of the things I was specifically looking for they didn't have. I'm going to let it slide as I'm sure it is a challenge to keep the shelves stocked the first couple of weeks. I was looking for broccoli rabe and for sicilian eggplant but they had neither. They only had one type of eggplant which really surprised me. Next stop, the cheese counter. It was so overwhelming. They had everything you could think of and to be honest, I couldn't think of anything I wanted because everything seemed so exotic. I did decide to pick up some ricotta salata for Pasta Norma which I made for my mom's birthday on Saturday and some fresh mozzarella which was still hot. I used that to make chicken Caprese. (I wish I remembered to bring my camera to Staten Island where I cooked everything. I'll have to make everything again so I can share it with you.) The meat department was really nice. There were about 10 guys behind the counter who were trimming and cutting fillet mignon from the beef tenderloins they had on sale for $4.00/lb. I waited on that line for 30 minutes! Once I got my meat I was ready to run out of there screaming, it seemed like the crowd followed me everwhere I went except for the registers. When I got to the cashier there was no one on line. Do people just stay there all night? Was I a lucky one to make it out alive? Wow! So, I let the toothless woman (okay not toothless, she had about three teeth) ring me up and she had to question every single item. "What's this?" she asked about the parsley, basil, cubanelle peppers. "Oh, and what about these?" she asked, puzzled. "Tomatillos." I said. "Toma..what?" It was hard for me to keep from rolling my eyes. How can Fairway hire cashiers that don't know what any of the items are? They should definitely give them a lesson in fresh produce so they don't look so silly in front of their customers. Shouldn't every employee know a little bit about fresh produce if they are going to be working there? That aside, I will definitely be going back to Fairway once things are settled there. I don't expect to buy any paper goods or canned items because I don't think I'll get any deals there but will definitely go back for produce, meat and cheeses. Maybe I'll even be brave and buy some fish.